Creating an Appointment Request Form
Tip: After reviewing this topic, click here to download a printable Quick Start Guide of these steps!
An appointment request form allows clients to request an appointment time that works for them without requiring an immediate response or phone call from your business. This means you can manage your appointment requests at a time that suits you while gathering the information you need to find a time that works for both you and your client.
As an added benefit, you can include fields that capture information specific to your business model. You can also include questions to find out more about why they are booking an appointment, so you can be more prepared to handle their requests or help them with their concerns.
After you create a form like the one below, you can provide it to clients in a number of ways, such as embedding it on your website or providing a shareable, unique link to the form on social media posts or in email campaigns.
How to use this form
- Each time a client submits the form, a notification email with the client's submitted details will be sent to a designated email address that is configured while creating the form. You'll configure the form so that a notification is sent each time the client submits the form, even if they already submitted this form in the past.
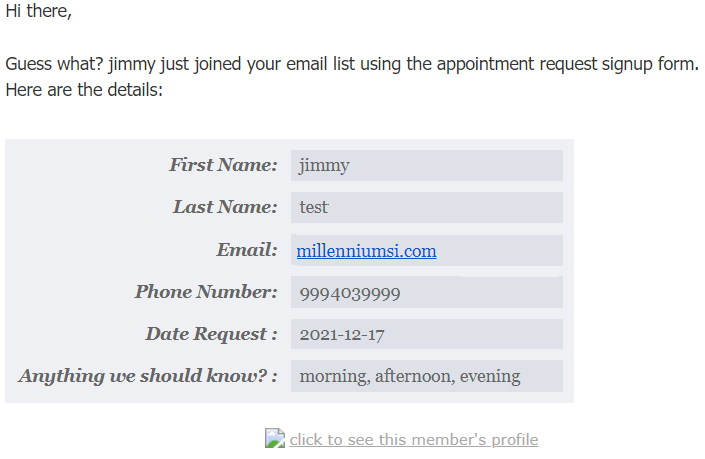
- After receiving a request, someone from your business will review the Meevo Appointment Book for openings and reach out to the client, working with them to determine a date and time.
- When the appointment date/time is determined, someone from your business books the appointment in Meevo:
- If this is a new client, you will create the new client profile using the information in the submitted form.
Note: If you configured Meevo to require certain fields when creating a client profile, make sure that information is being captured in your request form as well!
- If the client is an existing client, it is best practice to compare the information on the request with the information in the client's profile to ensure nothing has been added or changed.
To create an appointment request form
To create an appointment request form, you'll simply create a Regular Form and then add as many fields as you'd like.
- In Meevo, go to Marketing > Email Marketing and select My EMMA Login Page.

- Log in using the password you set during the account creation.
Important: Your login username is case-sensitive!
- In Email Marketing, select Audience.
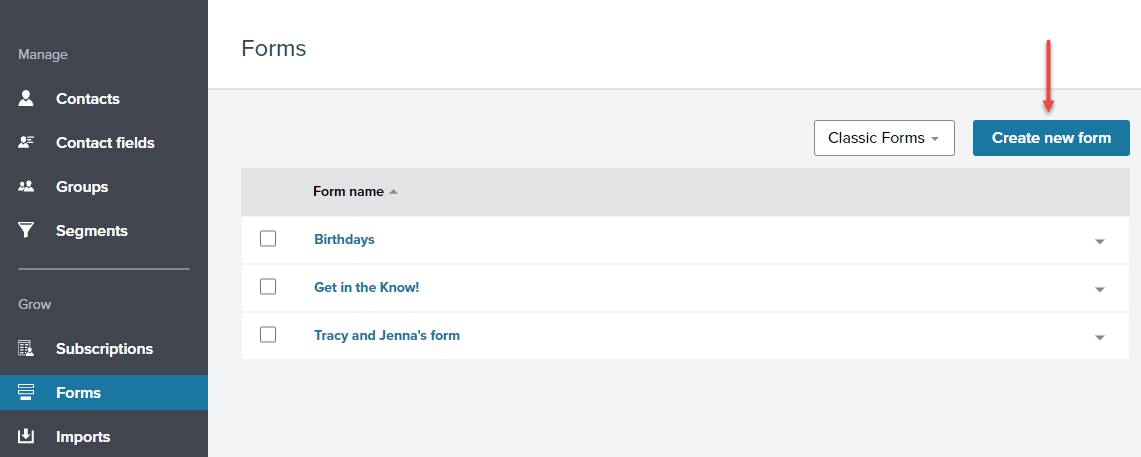
- Select Forms from the Grow menu on the left, and then select Create new form.
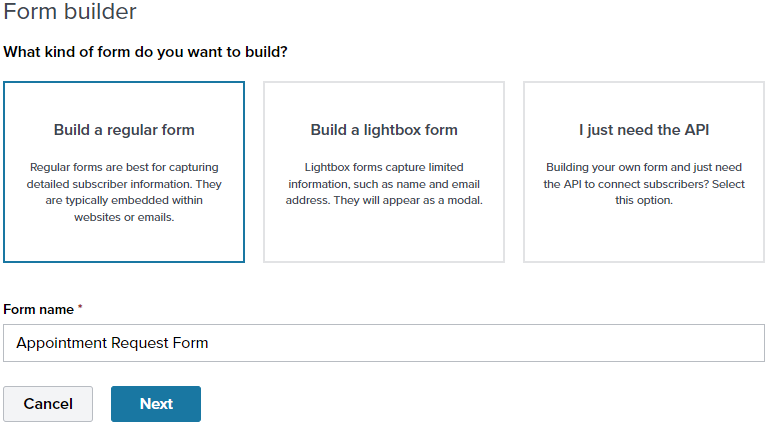
- On the Form Builder, select Build a regular form. We suggest naming the form Appointment Request Form (or something similar) so that you can easily identify the emails as appointment requests when they come in. Select Next.
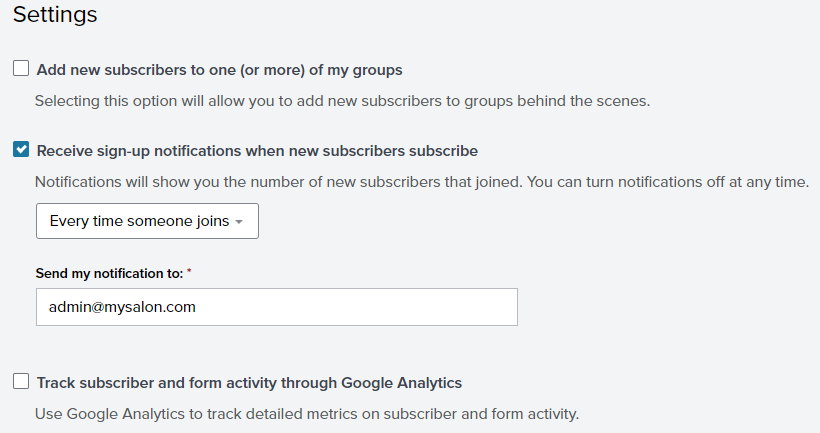
- Review this guidance for the following options under Settings, and select Next when finished.
- You must enable Receive sign-up notifications when new subscribers subscribe and set the drop-down to Every time someone joins so that you can receive emails each time an appointment request gets submitted.
- Under Send my notification to, enter the desired email of the inbox that will monitor these requests. We recommend several people monitor this inbox to ensure all requests are managed in a timely manner.
- If desired, you can enable Add new subscribers to one (or more) of my groups to automatically place new contacts who submit the form into a designated group (for example, you can create and select an Appointment Requests group). New contacts will also be added to the Active Audience list.
- If you are tracking activity through Google Analytics on other pages, we recommend enabling this option and entering your tracking code here as well.
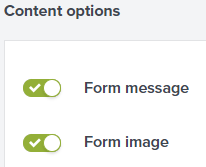
- Under Content options on the right pane:
- Enable Form message so you can create an introductory paragraph to the form.
- Enable Form image if you wish to upload a logo for the top of the form.
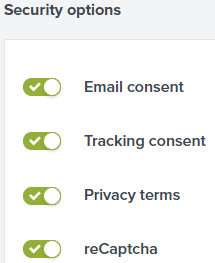
- Under Security options on the right pane, we highly recommend you enable these options:
- Email consent: This opts clients into your email marketing campaigns.
- Tracking consent: This adds an additional line that uses must check and accept, I consent to having my subscriber engagement tracked and analyzed.
- ReCaptcha: This protects the form from spam and abuse.
- Privacy terms: If you are providing Privacy Terms, enable this option.
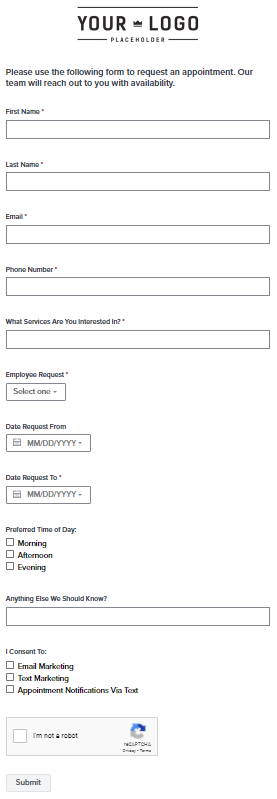
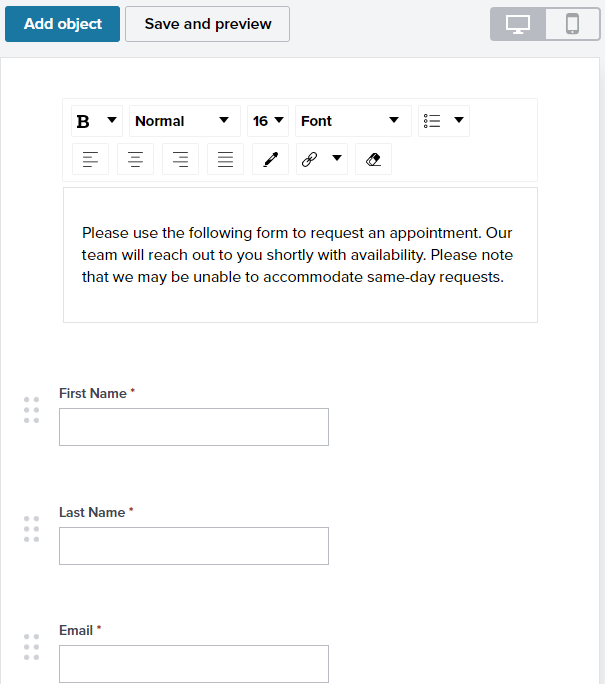
- Edit the default message that appears at the top of the form with something more appropriate for an appointment request, such as Please use the following form to request an appointment. Our team will reach out to you shortly with availability. You may also want to add a statement regarding your ability to accommodate same-day requests, as clients will be able to select the current day in the form's Date Pickers.
- Now, you'll begin building the form using existing and new fields. Select Add Object > Add a field to begin adding fields to the form.
- Under Select from your current fields, we recommend First Name and Last Name, both of which should be Required. Email is a default field and should always be on the form (and required as well).
- For the remainder of the form, you'll need to create custom fields to capture appointment request information. Remember, if your Meevo requires certain fields to create a client profile, make sure that information is being captured in your request form! Here are a few guidelines for some suggested fields:
Note: The custom fields that you create for the form will become Contact fields in Email Marketing. This means you'll have a little more relevant data for each contact who submits the form.
Note: It is extremely important that you do not delete any of the existing Contact fields (that is, any Contact field that you did not create for this form). Those existing Contact fields are required for the integration to sync properly.
- Phone Number: Set the field type to Numeric answer. Make this field Required.
- Which services are you interested in? This should be a Long Answer field type so that clients can provide all desired information. Make this field Required.
- Employee Request: Set this field type to Drop down menu and enter your available options. It is your choice whether you only want to provide "Any" options (Any Employee, Any Male, Any Female) or to provide employee names as well. Make this field Required.
- Date Request From and Date Request To: These should be Date picker fields, and made Required. If you wish to restrict requests to this year only, you can set those start and end years.
- Preferred Time of Day: This should be a Checkbox menu with Morning, Afternoon, and Evening options. It is up to you whether you require this field.
- Anything else we should know? This is a Long Answer field for clients to provide any additional, relevant information.
- I consent to: This should be a Checkbox menu with the options that correspond to the notifications your business offers, for example Email Marketing, Text Marketing, and Appointment Notifications Via Text. During appointment creation, you can make sure that these fields match up with the corresponding notification options in the client's profile.
- When finished designing the form, select Next.
- Under Messages, we recommend enabling and customizing the "success" message that appears after form submission. The "success" message can say something like Thank you for submitting your appointment request. A confirmation email is on its way to [email_address] and a member of our team will reach out to you shortly with availability. The client's confirmation email should convey similar messaging.
- Under Confirmation emails, enable both options (Send a confirmation email after signing up and Send an email after updating preferences). The second option ensures that clients receive confirmation emails, even if it's not their first submission. The messaging in those confirmation emails can be similar to your Success message.
- When finished, select Next to review and publish. If satisfied with the form, select Publish. Note that Publish does not actually send the form anywhere; instead, you will be provided with URLs and codes that you can use to distribute or embed the form.
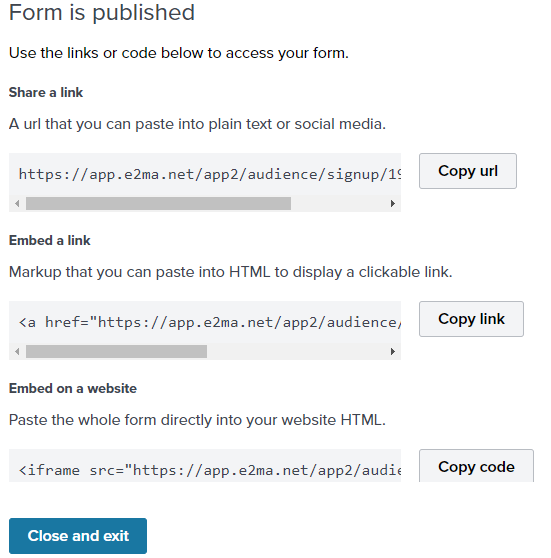
How to obtain the URL or code for your form
The first time you create your form, selecting Publish will reveal a pop-up that contains publishing information (shown above in step 16).
At any time after creating the form, you can revisit those publish details by opening the form, selecting Review, and then selecting Publish again.