Zapier Integration
Zapier is an easy-to-use tool for building and automating integrations between apps, known as "Zaps." A Zap is made up of a trigger and one or more actions or searches. Whenever the trigger happens in one app, Zapier will automatically perform the actions or searches in another app.
Meevo Triggers
Meevo currently offers Appointment- and Client-related Triggers through Zapier. Additional Triggers and Actions will be available in the future.
- Appointment Created
- Appointment Updated
- Appointment Deleted
- Appointment Checked In
- Appointment Checked Out
- Client Created
- Client Updated
- Client Communication Preferences Updated
- Client Deleted
- Client Merged
- Client Package Created
- Client Package Updated
- Client Package Redeemed
Before You Begin
In order to create Meevo Zaps, you will first need to:
- Create a Zapier account on zapier.com if you don't already have one. Zapier offers free accounts as well as paid subscription options.
Note: The free plan offers a limited number of tasks per month. We recommend using the free plan as a "sandbox" to prove out your concepts, and when you are ready to publish, upgrading to a plan that offers more tasks and allows for multi-step Zaps.
- Add the Zapier integration to Meevo by going to the MeevoXchange > Integrations and selecting Zapier.
Getting Started
Before you can start creating Zaps in Zapier, you'll need to perform a couple of steps in Meevo.
- Type zapier into the Convobar or go to Meevo > Integration > Zapier, then follow the steps below.
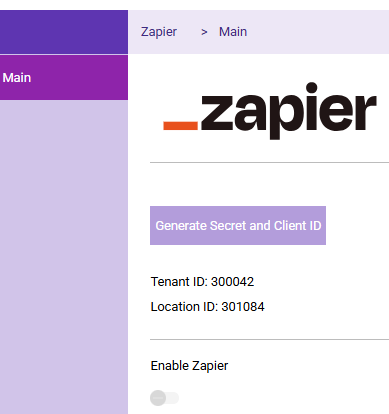
- Generate your login credentials by selecting Generate Secret and Client ID.
Important: It is extremely important that you save the Secret somewhere safe in a file that you can easily access. Once you select Save on the Meevo Zapier screen, the Secret becomes masked and you will be unable to view or copy it again. We recommend copying both the Client ID and Secret, as you will need both when authorizing Meevo in Zapier.
Should you need a new Secret, select Re-generate Secret. Keep in mind that generating a new secret will break authentication on existing Zaps, so you'll need to re-authenticate those Zaps using your new Client Secret.
- After generating the secret, the Enable Zapier switch becomes available to edit. Toggle the switch to the "on" position.
- This switch must remain on for Meevo to send data to Zapier.
- Turn this switch off only if you wish to stop using Meevo-related Zaps.
- Select Save to finish enabling the integration.