Front Desk Advisor: AI Receptionist
The AI Receptionist, part of MeevoIQ’s Front Desk Advisor, gives your business a new way to assist clients by phone. It can help with common scenarios and answer questions about your business, even when your front desk is busy or your location is closed.
Depending on how you configure it, the AI Receptionist can:
- Identify existing clients and collect the information needed to create new client profiles.
- Search for appointment availability.
- Book appointments.
- Reschedule or cancel appointments.
- Share your location’s business and holiday hours, as well cancellation policies.
- Explain your service menu, service descriptions, and available add-ons.
- Transfer callers to a member of your team when they request or require additional assistance.
Plus, you can choose whether the AI Receptionist answers every call, overflow and after-hours calls, or after-hours calls only.
Note for Multi-Location Businesses
The AI Receptionist is available at the location level only and cannot be set up from Central Office. Because appointment booking is tied to an individual location’s Appointment Book, each location that uses the AI Receptionist must complete its own setup.
Before You Begin
Setting up the AI Receptionist involves three separate phone numbers. Your business provides two of them (the business and transfer numbers), while Meevo creates the Agent number during the setup process.
- Business phone number: The number clients currently use to call your business.
- Agent number: The dedicated number Meevo creates for the AI Receptionist during this setup process. Once the AI Receptionist is set up, you will need to contact your phone provider to forward calls from your Business Number to this Agent Number.
- Transfer number: The number the AI Receptionist transfers to when a caller needs to speak with a person. This number should ring your front desk, where a team member can answer (or the call can be directed to voicemail).
Important: The business phone and transfer number must be different numbers.
You will also need to provide an email address that we'll use to contact you about the AI Receptionist, if necessary.
Typical call flow
The typical call flow is:
- A client calls your business phone number.
- The call is automatically forwarded to the AI Receptionist’s dedicated number.
- The AI Receptionist answers and assists the client throughout the call.
- If the client needs a person, the call is forwarded to the transfer number.
Setting Up the AI Receptionist
- To get to the AI Receptionist settings, go to Meevo > Management > AI Receptionist or type AIR into the Convobar.
- Select Settings from the left navigation pane. When you first arrive on the setup form, it appears with a Not set up yet status.
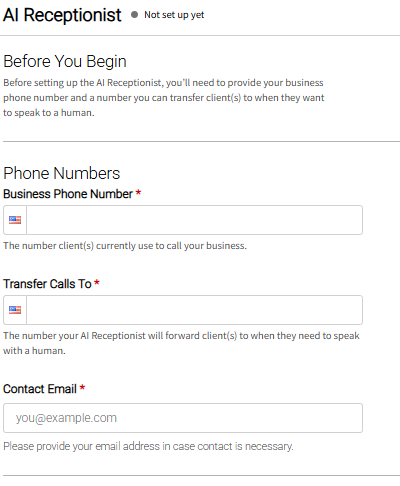
Entering your contact information
Under Phone Numbers, complete the following fields:
- In Business Phone Number, enter the number clients currently use to call your business.
- In Transfer Calls To, enter the number that should receive calls when a client needs to speak with a person. This number should ring your front desk, where a team member can answer or the call can be directed to voicemail.
- In Contact Email, enter an email address MSI can use to contact your business about the AI Receptionist, if necessary.
Choosing the agent’s name and voice
Next, let's give your AI Receptionist a name and choose the voice that best fits your business! The name is included in the greeting callers hear, while the selected voice helps establish the Receptionist's tone and personality.
Under the Agent section of the form:
- In Name, enter the name the AI Receptionist should use when greeting callers.
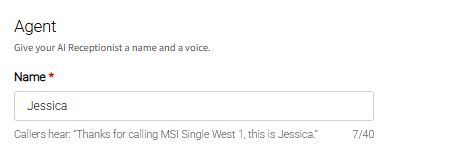
- You can keep the default name or enter one that better suits your business.
- The sample greeting below the Name field shows how the Agent will introduce itself.
- Under Voice, explore the voices to help you decide on which AI Receptionist to use.
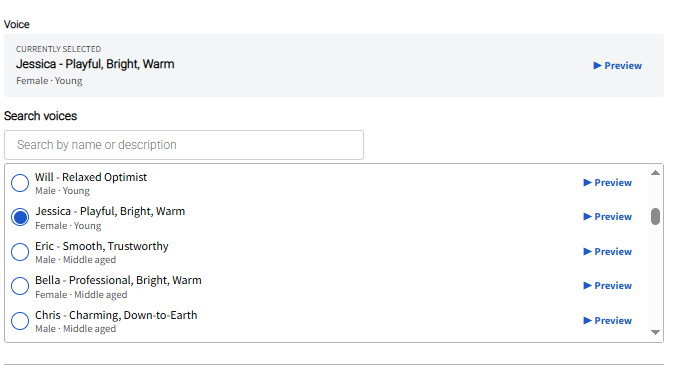
- Each voice includes descriptive characteristics, such as playful, warm, reassuring, or confident, along with details such as gender and approximate age.
- Select Preview to hear a voice before making your choice.
- Use the Search field to find a voice by name or description, such as "female, middle-aged."
- Select the voice you want the AI Receptionist to use. You can return to these settings later if you want to rename your AI Receptionist or choose a different voice.
Choosing when the AI Receptionist will answer calls
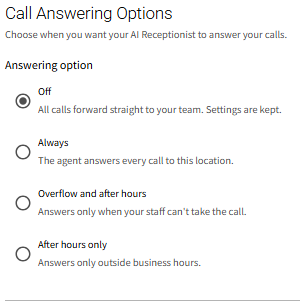
Under Call Answering Options, select one of the following:
- Off: The AI Receptionist will not answer any calls at any time.
- Always: The AI Receptionist answers every call.
- Overflow and after hours: During business hours (as defined in Business Information), your team has the first opportunity to answer. If the system detects that the call is being picked up by voicemail, it redirects the caller to the AI Receptionist. Outside of business hours, the AI Receptionist answers all calls.
- After hours only: The AI Receptionist answers all calls received outside of the business hours defined in Business Information.
Choosing how callers are verified
Under Caller verification, select how the AI Receptionist should verify a caller's identity. The AI Receptionist uses the selected verification level to identify existing clients and collect information when creating new client profiles.
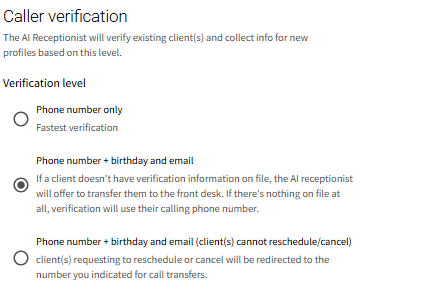
- Phone number only: Uses only the caller’s phone number for the fastest verification. If the Receptionist cannot identify the number (for example if the calling number turned off Caller ID), the Receptionist will ask for the full number.
- Phone number + birthday and email: The AI Receptionist first uses the caller’s phone number to locate a client profile. If multiple profiles share that number, it asks for the caller’s first and last name to identify the correct profile. From here, the additional information requested depends on what is stored in that profile:
- If both a birthday and email address are on file, the caller must provide both.
- If only one is on file, the caller must provide the available information (either their birthday or email address).
- If neither is on file, the caller is verified using the matched phone number and name.
- If the calling number does not match an existing profile, the AI Receptionist treats the caller as a new client and collects their name and phone number to create a profile. It does not request a birthday or email address.
- Phone number + birthday and email (clients cannot reschedule/cancel): Verifies callers using the same process described above, but does not allow them to reschedule or cancel appointments through the AI Receptionist. These requests are transferred to your front desk so your team can assist the caller.
Saving and Activating the AI Receptionist
After reviewing the phone numbers, agent settings, answering option, and verification level, select Save.
Testing your AI Receptionist setup
When you save the form, Meevo immediately provisions a dedicated Agent number and displays it under Your Agent’s Number.
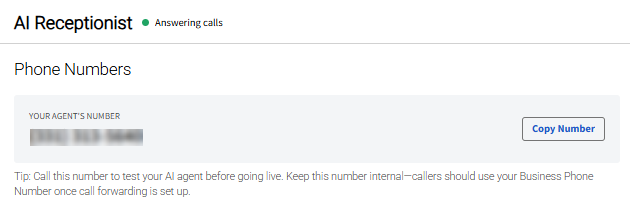
Before you set up call forwarding, call your Agent number directly and interact with the AI Receptionist as a client would. This gives you an opportunity to become familiar with the experience and confirm that everything sounds and works as expected.
During the test call:
- Confirm that the Agent uses the correct name and greeting.
- Make sure the selected voice and tone feel right for your business.
- Ask to speak with a person and confirm that the call reaches the correct transfer number.
If you make any changes after testing, select Save and call the Agent number again before forwarding live calls.
Forwarding calls from your Business Number to your Agent Number
Once you have tested your AI Receptionist and are comfortable with the experience, you are ready to begin routing client calls to it. Clients will continue calling your existing Business Number; your phone provider will forward those calls to the Agent Number behind the scenes.
- Contact your phone provider and set up call forwarding from your Business Number to the Agent Number.
- Call your business phone number and confirm that the AI Receptionist answers.
- Test a transfer and confirm that the call reaches the number entered under Transfer Calls To.
- Once the AI Receptionist is active, its current status appears beside the AI Receptionist heading (for example, Answering Calls).
Reviewing the Call Log
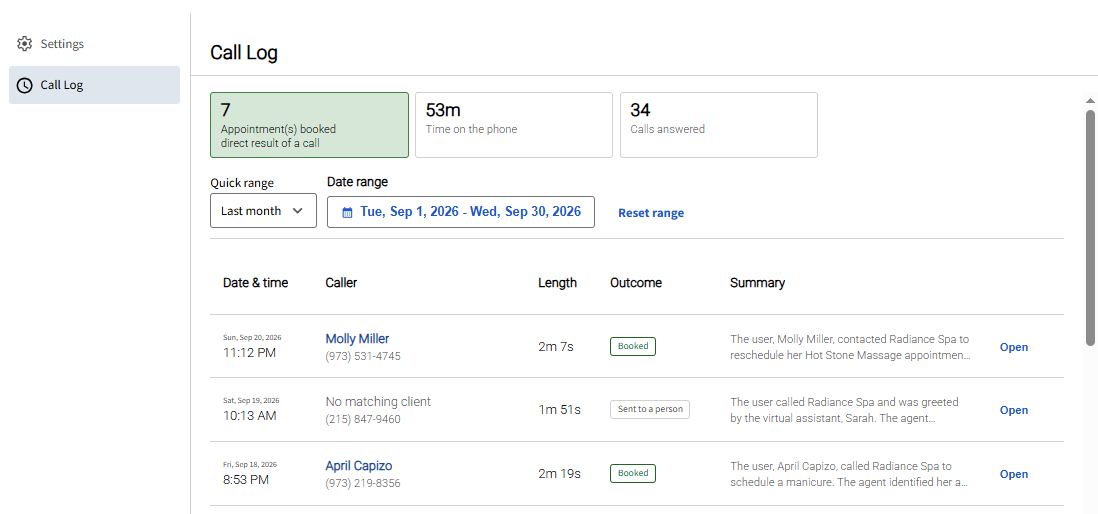
The Call Log provides an overview of calls handled by the AI Receptionist and detailed information about each conversation.
- Select Call Log from the left navigation pane.
- Select a Quick range or enter a custom Date range to choose the calls you want to review. Select Reset range to restore the default range.
- Review the summary tiles for the selected period:
- Appointment(s) booked: Appointments booked by the AI Receptionist.
- Time on the phone: Total duration of calls handled by the AI Receptionist.
- Calls answered: Total number of calls answered by the AI Receptionist.
- Review individual calls in the grid. Each entry includes:
- Date and time
- Caller name and phone number, when identified
- Call length
- Outcome, such as Booked, Sent to a person, Callback asked, Needs follow up, or Outcome unclear
- A brief summary of the conversation
Understanding Call Log outcomes
The AI Receptionist assigns each call an outcome based on its understanding of the conversation. The outcome provides a quick summary and may not reflect every detail of the call. You should always review the call details for additional context.
- Booked: Indicates that an appointment was booked during the call.
- Needs follow up: Indicates that the AI Receptionist identified an unresolved request or another opportunity for your team to assist the caller. For example, a client may have cancelled an appointment without rescheduling.
- Sent to a person: Indicates that the call was escalated or transferred to your team.
- Callback asked: Indicates that the caller requested or agreed to a callback. For example, this may occur when a transfer cannot be completed.
- Outcome unclear: Indicates that the AI Receptionist could not determine a clear result from the conversation, such as when a call ends early.
Viewing details about a call
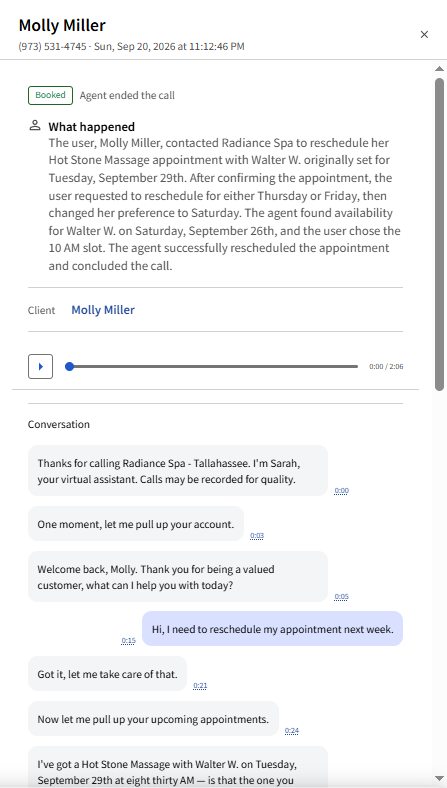
- Select Open beside a call to display its details panel. The panel includes:
- The caller’s name, phone number, and call date and time
- The call outcome and how the call ended
- A What happened summary describing the caller’s request and the action taken
- The matched Client profile, when the caller was identified
- A recording of the call, when available
- A time-stamped transcript of the conversation between the caller and the AI Receptionist
- Use the recording, transcript, and summary to understand how the request was handled and identify calls that may require follow-up.
Editing AI Receptionist Settings
Return to Settings whenever you need to update the AI Receptionist’s name, voice, answering option, caller verification, contact email, or phone numbers. Remember to select Save after making changes.
Tip: We recommend testing the AI Receptionist after every change to confirm it behaves as expected before handling live calls.
Turning the AI Receptionist On or Off After Call Forwarding Is Set Up
The Call Answering Options setting determines whether the AI Receptionist answers calls. It does not change the call forwarding configured through your phone provider.
- When the AI Receptionist is on, forwarded calls are handled according to the selected answering option.
- When the AI Receptionist is set to Off, it does not answer. Calls that are forwarded to the Agent Number are instead sent to the number entered under Transfer Calls To.
If you want calls to stop routing through the AI Receptionist number entirely, contact your phone provider to change or remove call forwarding.