Using Meevo Messenger
To get to Meevo Messenger:
- For Textel, type textel into the Convobar, or go to Meevo > Integration > Messenger.
- For Meevo Messenger Arrivals or the MeGo client app, type meevomessenger into the Convobar, or go to Meevo > Management > Meevo Messenger.
To find and reply to existing messages
- In the left pane, enter a client/employee name or mobile number in the Search Messages field to locate the existing message in the list.
- To narrow down the list, select the filter icon to filter messages by status:
- MeGo and Textel filters include the following: All Messages which displays any message (read or unread), New Messages which displays unread messages, and Messages for Follow Up which displays messages that have been marked for follow up. You can also filter by date range. Select Show most recently received message to display all of the conversations' most recent inbound message, regardless of whether or not the business replied.
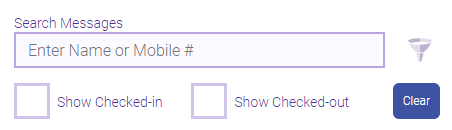
- Arrivals filters include Show Checked-in and Show Checked-out appointments.

- MeGo and Textel filters include the following: All Messages which displays any message (read or unread), New Messages which displays unread messages, and Messages for Follow Up which displays messages that have been marked for follow up. You can also filter by date range. Select Show most recently received message to display all of the conversations' most recent inbound message, regardless of whether or not the business replied.
- Select the message. The conversation appears in the chat pane on the right.
- Enter your reply into the text box and send it by selecting Enter on the keyboard/keypad or by selecting the blue Send arrow.
To mark a message as "Follow Up"
While conversing with clients or employees, you may find you need to follow up with the person at a later time. For those situations, you can mark the message for "follow up" by selecting the triangle shown below. When the triangle is red, the message is marked for follow up. Follow-up messages can be easily found using the advanced filter.

To view client information
Meevo Messenger provides quick links that allow you to jump directly to various areas of a client's profile in order to look up more information on that client.
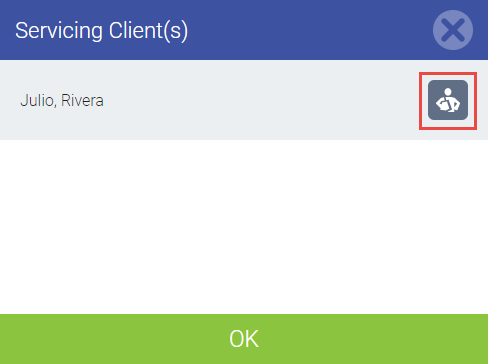
- In the chat pane, select the client icon to the right of the client's name.

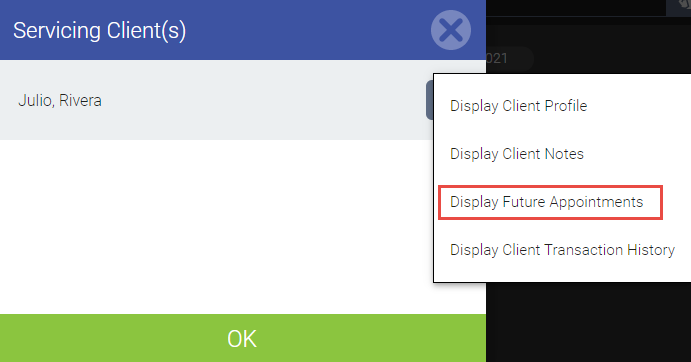
- Select the desired link from the drop-down.
- Display Client Profile: Brings you to the Main tab of the client's profile.
- Display Client Notes: Brings you to the Notes tab of the client's profile.
- Display Future Appointments: Brings you to the History tab of the client's profile, with Appointment History selected.
- Display Client Transaction History: Brings you to the History tab of the client's profile, with Transaction History selected.
To refresh Meevo Messenger
You may need to refresh Meevo Messenger occasionally to see updated messages (if you aren't configured to receive real-time notifications) and/or to view updated appointment statuses. To refresh Meevo Messenger, select the refresh icon in the left panel.

To initiate a new message (Textel Integration only)
There are two ways to initiate a new message to a client or employee:
- In Meevo Messenger, select New Message.

Two fields appear in the chat pane.

- In the right pane, enter the client/employee name in Find a Client by Name or Number and select the appropriate name from the drop-down. Do this for clients or employees who are already in your Meevo database.
- Alternatively, enter the phone number in Enter Phone Number to Text. Do this for clients or employees who are not yet in your Meevo database.
- Go to the client or employee profile in Meevo, and select Send text (shown below) beside the Mobile number. When Send text is selected, Meevo Messenger automatically opens with the selected client or employee information already populated in the message.

To check in a client (Meevo Messenger Arrivals only)
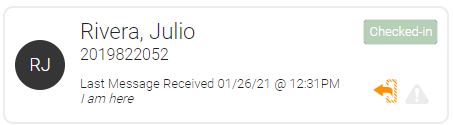
If you enabled Check-in client upon arrival, the client will be checked-in automatically if their reply to the arrival notification included the word "here." If you did not enable automatic check-ins, you can manually check the client in by following these steps.
- In the chat pane, select the client icon to the right of the client's name.

- On the Servicing Clients window, select client icon next to the appropriate client to reveal the drop-down.
- Select Display Future Appointments.
- The client's future appointment appears in the Client Find pane that slides out from the right. Select the check-in icon:

- The client's chat record on the left pane reads Checked-in, indicating that the action was successful.