Advanced OPM: Creating a Social Post via Calendar
The Post feature allows you to create and publish content directly from the Calendar to platforms like Facebook, Google, Instagram, Apple, and other supported publishers. This centralized workflow makes it easy to manage and schedule posts across multiple channels from one place.
- Click Social in the navigation bar and click Calendar.
- Click + New Post.
- Add a Post Title. This will not be displayed on the post; it is used within OPM for you to identify posts in the platform and analytics.
- Select a Post Type:
- Select Schedule Post to post at a later time, and choose the date and time you want the post to be published.
- Select Immediate Post to post immediately
- Select the entities you would like to post to.
- If you want to post to a location page, select a location entity type.
- If you want to post directly to a brand page, select a brand entity type. You will need to ensure that the brand entity type is configured before creating a post. See Brand vs. Location Page Posting to learn how.
- Select the publishers you would like the post to be published on by clicking on their logos.
- Refer to the sections below to create your caption and post.
Creating a caption
- Start by filling out the General section.
- Make modifications to any written caption content by clicking the Transform button and choosing one of the options in the drop-down.
- To add an Embedded Field to the post, click on the Embed Field button below the text box. This option is not available for all publishers.
- For example, selecting the CITY field to be within the text string “New items coming soon to our [[CITY]] storefront” will allow you to use the same message for various locations without having to create individual posts for each.
- If no data is rendered for a specific entity in the preview of the embedded field, double-check that the selected entities all have data populated in the selected fields within the Knowledge Graph.
- Additionally, if the embedded field being referenced does not include data for a specific location, the post will still publish but that field will appear blank. For example, if the embedded field for an entity has no data for an entity then the caption may say something like “New items launching soon at our location” in the below example.
- To add an AI-generated caption, click the Generate button. You will optionally add further details to help us write a caption for the post.
- Add a prompt to give instructions on how to structure the caption. If you want any media to be used to help generate the caption, add that prior to this step.
- Select the Tone of the message using the drop-down.
- Select the Post Type, and include a Target Audience such as Shoppers or locals in the New York City area.
- Add any keywords you want to use in the post.
- Click the Generate button in the preview. You can generate new captions by clicking the Generate button again in the preview.
- Use the Transform button to make modifications to the current caption while keeping the overall message.
- Click Continue when you are happy with the caption.
- Add a text asset by clicking the Add Asset button. Select from the list of assets and click Continue at the bottom of the modal.
- To add a photo to the post, click on the + Add Media button, and add your photo using one of the methods.
- To add a video to the post, click on the + Add Video button. This option will only be available if you post to publishers that accept video media (e.g., Instagram, Facebook). You will have the option to add a video via file upload or URL.
- Select a Cover Image (optional). You can optionally add an image to be used as the cover image. Otherwise, the first frame of the video will be used.
- Choose the Facebook Video Type. Select if you want the video to appear as a video or a reel. This is for posts made to Facebook only. All Instagram videos will be created as reels.
- Add a Facebook Video Title (optional). This title helps users understand what your video is about and makes it easier for them to search for your video. Including targeted and descriptive keywords increases the video’s discoverability on Facebook. This will not appear in the page feed but does appear when you click into the video.
- For certain publishers such as Google or Facebook, there are additional fields you can configure before posting. For example, you can add a CTA to a Google post or a hyperlink to a Facebook post. Update these fields by selecting the name of publisher tabs next to the General tab.
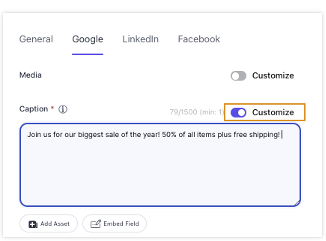
- You also have the ability to customize posts based on publisher (custom posts per publisher). For example, you may want to do things like:
- Add hashtags to the Instagram version of the post but not for Google.
- Use a different image or videos based on publisher capabilities.
- Create a caption with different wording based on target audience
- Similar to publisher-specific fields, you select a publisher tab. Click the Customize toggle next to the content you want to update. You will be able to review the differences in content for each publisher in the post preview.
- Click Schedule Post or Post Now to publish your post.