Step 1: Add a Client to the Walk-In Manager
- Go to Meevo > Appointments > Walk-In Manager, or type walkinmanager into the Convobar.
- Select Add to Walk-In Manager in the bottom-right corner. The Add to Walk-In Manager window appears.

- Add a client:
- To search for and add an existing client, select Search for Client and enter the client's name.
- To add a client who does not yet have a profile in Meevo, select Add New Client and fill out the required fields. This creates the client's profile in Meevo.
- Review the client options:
- Notify client via text regarding wait list status: Enables Walk-In Manager text notifications for the client. This setting overrides the client's notification settings in the client profile.
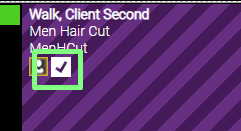
- Client will wait in waiting area: Select this option if the guest is staying at your location while waiting for the next appointment. This option "checks-in" the client in Walk-In Manager, indicated by the "enabled" green check mark beside the client's name.

Remember, this option does not check-in the client in the Appointment Book, as you cannot check-in a temporary appointment. However, there will be a check on the temporary appointment that the client is currently waiting.
- Move client to top of list: Inserts this client into the list at position 1.
- Select Continue.
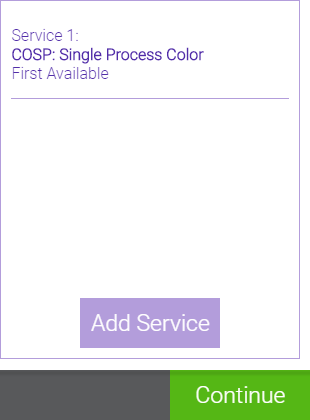
- Select a service in Look Up Service or navigate through the Service Category tiles to locate a service. Remember, the services that appear here were selected in Walk-In Manager Settings. Selecting a service automatically advances you to the final step.

- Select an employee from Look Up Employee, or select one of the tiles. A summary of your selections appears to the right. Select Add Service to add another service (explained in step 6), or select Continue to advance to the Summary screen.
- On the Summary screen, enter any client Notes. These notes can be viewed via hovering over the note icon in the Walk-In Manager once the client is added to the list. Adding a note here will add an appointment note in the Appointment Book.

- If you are satisfied with the details, select Add to Wait List to add the client to the list and return to the main Walk-In Manager screen.
- If Show all clients on the wait list as temporary appointments in the appointment book is selected in Walk-In Manager Settings and there is an available slot in the Appointment Book, a temporary appointment appears in purple in the Appointment Book. Remember, the appointment hasn't been solidified in the Appointment Book yet, so this temporary appointment is a visual reminder that you will likely (but not definitely) have an appointment in this slot.

- Now that the client is on the Walk-In Manager wait list, here are your next steps:
- When the client arrives to your business, check-in the client via Walk-In Manager.
- If the client is already waiting onsite for their appointment and is already checked-in, your next step is to book the temporary appointment.