Setting Up the Walk-in Kiosk and Walk-in Online Wait List
To get to Walk-In Manager Settings, go to Meevo > Business Settings > Walk-In Manager Settings.
- Select the Main Settings tab and select Edit. The following settings are under Walk-in Kiosk and Online Wait List Settings.
- The Online Wait List URL is not an editable field; Meevo automatically populates this field. Select Click to copy URL and paste this URL into your browser to experience the Wait List from a client perspective.
- Enable clients to add themselves to the online wait list: Enabling this option turns on the Walk-in Online Wait List.
- Do not show all clients on the wait list: When enabled, clients will only see themselves on the Walk-in Online Wait List.
- Limit Wait List add to ___ miles from client's current geolocation: Clients will be able to add themselves to the Walk-in Online Wait List only if they are accessing the site from a location whose proximity from the business is within the mileage entered here.
- Override location mileage limit when wait time is over ___ minutes: If the wait time is greater than the value entered here, this setting overrides the mileage setting (step 5 above) by expanding the search area beyond what was set.
- In the Terms and Conditions text box, enter the terms and conditions that display to the client if the Terms & Conditions link is selected from the Walk-in Online Wait List.
- Most popular service: The service selected here is used to calculate the estimated wait time for position 1 in the wait list. The service timings determine the wait time. For a service to appear in this drop-down, the service must be selected for Walk-ins via the Walk-in Manager Settings Services tab.
- Confirmation screen auto close in ___ seconds: After clients add themselves to the Walk-in Online Wait List via the kiosk, a confirmation screen appears on the kiosk and will remain on-screen for the duration entered here.
- Enable entry of email address in kiosk and online wait list: Enables the Email field for clients who are using the Walk-In Manager Kiosk or Walk-in Online Wait List.
- Enable entry of appointment notes in kiosk and online wait list: Allows clients who are using the Walk-In Manager Kiosk or Walk-in Online Wait List to enter appointment notes during the booking process.
- Hide Any Male/Any Female options in: Walk-In Manager, Online Wait List, and Kiosk: Hides the Male Only and Female Only tiles in the employee selection step of the Walk-In Manager booking process.
- Hide wait time estimate: Hides from clients the "when" section of the Walk-In Manager Kiosk.
- Default to first available employee and skip selection in Online Walk-In and Kiosk: Skips the employee selection step in Walk-in Online Wait List and Kiosk and instead automatically selects the first available employee.
- In the Kiosk, replace the business logo with the current wait list: If enabled, the left pane of the kiosk displays the current Walk-in Online Wait List. Otherwise, this pane displays the business logo, if any. If there is no logo, the business name appears here.
- Client name format for Display Monitor and Online Wait List and Time format display for Display Monitor and Online Wait List: Determine the client format and time display format, respectively.
- Show all clients on the wait list as temporary appointments in the appointment book: When enabled, a temporary appointment appears in purple in the Appointment Book after the client is added to the Walk-in Manager, but before the appointment is actually booked. Remember, since the appointment hasn't been accepted in the Appointment Book yet, this temporary appointment is a visual reminder that there will likely (but not definitely) be an appointment at this time.

- Show address fields in Kiosk and Online Wait List: Client address fields will be shown or hidden in the Kiosk and Walk-in Online Wait List based on the status of this option.
- Maximum number of guests: Determines the maximum number of guests a client can book using the Walk-in Kiosk or Walk-in Online Wait List.
- In the Custom Confirmation Page Message and/or Fully Booked Message sections, enter the text that will appear in the Walk-In Kiosk or Walk-in Online Wait List in either of those situations. If desired, select a tag from the list to add it into the text box.
- When finished, select Save.
Customizing the Walk-in Online Wait List
You can customize elements of your Walk-in Online Wait List using Meevo's Custom Branding feature.
To display the Business Name
In Custom Branding > Cover Design, the Business Name...
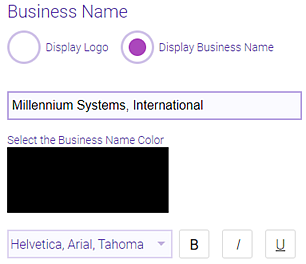
...determines what business name will appear in the Business Information tray on the left of the page.

To display a Logo
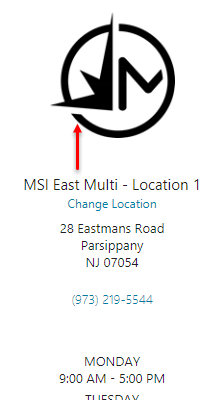
In Custom Branding > Cover Design, the Logo...

...determines the logo that appears on the Business Information tray on the left of the page.
To change the Accent Color (buttons on the Wait List)
In Custom Branding > Page Design, the Button Color determines the color of the buttons on the Walk-in Online Wait List.
Change the Header Bar color and Font Color
Changing the header bar and font colors on the Page Design tab affects the header across all Online Wait List pages.
