Integrating Email Marketing and Shopify
Note: This article focuses on how to integrate Emma (Email Marketing, one of our Meevo integrations) with Shopify using Zapier. Meevo does not currently offer a direct integration with Shopify. For details on Meevo's integration with Zapier, refer to the Zapier Integration article.
The original Emma for Shopify integration was sunset in 2023 and replaced with Zapier, a flexible third-party application that allows you to connect Emma with Shopify and thousands of other apps. Through Zapier, you can set up automated workflows (called "Zaps") that pass information between Emma and Shopify.
For example, you could automatically add new Shopify customers to your Emma email list or send purchase data from Shopify to Emma for more targeted email marketing. This setup offers considerable flexibility, as Zapier can connect Emma with a variety of tools beyond Shopify.
To Connect Emma with Shopify
Below is a brief rundown of how to connect your Email Marketing (Emma) account to Shopify. We also highly recommend reviewing these Emma Help articles, as they contain more useful details about the integration.
1. Obtain a paid Zapier account
To set up a Zap between Emma and Shopify, you'll need a paid Zapier account ("Professional" at a minimum), as Shopify is considered a Premium app.
2. Obtain your Email Marketing Account ID
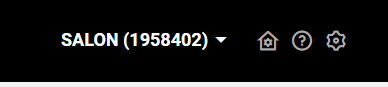
Obtain your Email Marketing Account ID and have it on hand. That number can be found in the top-right corner of Email Marketing next to your business name.
3. Generate an API key pair
We recommend that you create a new user whose API key pair you will use solely for this integration. As an alternative, you may also select an existing user who has not yet generated an API key pair, have them generate an API key pair, and then use that API key pair for this integration.
This is important because if a user regenerates their API key pair, it will break the existing key pair and disconnect all integrations that used that key pair. So to prevent disruptions, we recommend you create (and do not delete!) a specific user whose API keys will only be used for this purpose.
- Create a new user. We recommend using the Manager or Administrator role.
- Have the new user log in to Emma.
- The new user will need to generate an API Key Pair in Email Marketing. They must record the public and private API keys somewhere safe, as the private API key will only be shown once.
4. Create contact fields, segments, and a destination group in Email Marketing
Note: If you used the legacy Shopify integration, then the the contact fields, segments, and destination group listed below were already created when you set up the original integration. If you don't have them, then you'll need to create them.
- We recommend creating the following 5 contact fields.
| Field | Type |
|---|---|
| Total number of orders | Numeric |
| Total purchased (Money spent) | Numeric |
| Highest purchase ($) | Numeric |
| Average purchase ($) | Numeric |
| Last purchase date | Date |
- We also recommend creating the following 6 segments.
- Average purchase is greater than $50
- Cumulative purchases are greater than $100
- Have more than one total order Purchased in last 30 days
- Purchased in last year
- Subscribed, but have not purchased
- Create a destination group for your Shopify customers. We recommend "Shopify Customers" or something similar.
Helpful Tips
- Before setting up the integration, be sure that you have the required fields, segments, and group in your Emma account.
- Create test orders in Shopify and mark them as fulfilled. Also create test contacts in Emma. When you configure your zap in Zapier, it will look for the most recent Shopify orders, so this will allow you to test to confirm that the connection is working.
Authenticating Shopify and Emma in Zapier
To create a zap, you'll need to authenticate your Shopify and Emma accounts in Zapier. You'll only need to do this step once, unless your Shopify domain or Emma user changes.
See Connecting Emma and Shopify for step-by-step details on authenticating Shopify and Emma in Zapier.
Zap Templates
The folks at Emma created seven pre-built zap templates to make it easy to set up your integration. We recommend that everyone use the first five templates, but the last two templates are helpful if you want to utilize product creation and tracking.
- Add new Shopify order to Emma contact or create new contact: When a new order is created in Shopify, add the order to the appropriate contact in Emma and create a new Emma contact, if necessary
- New Shopify order and create new contact in Emma: When a new customer is created in Shopify, create a contact in Emma
- Updated customer information in Shopify and update Emma contact: When a customer's information is updated in Shopify, update their information in Emma
- Updated Shopify order and update Emma contact: When an order is updated in Shopify, update the order for the appropriate contact in Emma and create a new Emma contact, if necessary
- Update Emma contact when Shopify order is cancelled: When an order is cancelled in Shopify, update the order for the appropriate contact in Emma
- Create product in Shopify and update Emma product: When a new product is created in Shopify, create or update the appropriate product in Emma
- Update Shopify product and create or update product in Emma: When a product is updated in Shopify, create or update the appropriate product in Emma
If desired, you can create your own zaps. However, we strongly recommend using the templates in order to ensure that you're using the correct Shopify triggers and actions in Emma.
Note: All newly created contacts in Emma will automatically have an active opt-in status. As a result, you'll need to be sure that you're adding customers to Emma based on their opt-in status in Shopify.