MeGo (a Client-Focused App)
Most Meevo businesses are looking for ways to communicate with clients in the most effective ways possible, and this is where MeGo comes in. MeGo is a fully customizable branded solution designed to elevate communication with your clients. The MeGo app helps increase your visibility, delivers value to your clients, builds brand recognition, allows for better client engagement, boosts revenue and sales, and to top it all off...it's such a simple way to communicate with your clients!
Tip: Use Online Booking Announcements and Email Marketing Campaigns to promote MeGo to your clients!
How clients locate your business in MeGo
After downloading MeGo from their preferred store, clients can search for your business based on your business phone number. This will be the number detailed in the Business Information tab of Business Settings.
If a client visits multiple businesses or locations that use the MeGo app, they can access each one within the same app by switching locations from the Location menu.
What clients can do in MeGo
Every feature in MeGo is adjustable, allowing your business to tailor the app to your unique models by either hiding or displaying different features. MeGo empowers clients by offering them the ability to:
- Book appointments and purchase gift cards:
Provide easy access to your Online Booking and eGift sites through the app. Not using Meevo's Online Booking or eGift? No problem! We provide a URL field for directing clients to your custom booking / gift card solution. - Purchase products:
MeGo also provides a URL field for linking clients to your custom eCommerce solution, like Shopify or WooCommerce. - Send 2-way messages:
Clients can send questions directly to your business through the app! Those messages appear to you via the MeGo tab of Meevo Messenger, where employees can respond. These are messages, not texts, so messages sent to and received from MeGo do not count towards your monthly text allotment! - View in-app promotions:
Create messages that can be used for employee announcements, new service offerings, or promotions/sales. Create a promo from scratch or use one of our promo templates to get started. Send the promo as a push notification to convey important information such as new services, a newly opened location, a new employee, or change of business hours due to holidays or inclement weather! - View the Services menu:
Includes descriptions and customizable pricing, along with the ability to display available packages. With customizable pricing, you can even include phrases such as "and up" to indicate a base price or "call for pricing" if you'd rather not advertise the price in the app. - View service providers' bios:
Clients can view employee bios as well as submitted ratings for each service provider. - View their purchase history:
Each client can view their own personal service, product, package, gift card, and membership sale history in the app. - Receive a "Welcome" notification:
A MeGo Welcome Notification can be configured and sent to clients who log into MeGo for the first time. Use the default Notification Template to introduce the client to MeGo and its features, or customize the message to provide any other pertinent information about your business that you'd like to share! - Navigate between locations:
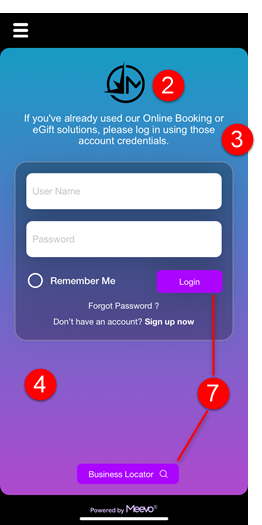
Clients can use the Business Locator button to change locations by entering a location's phone number.
MeGo seamlessly integrates with...
Online Booking, eGift, and Online Membership Sales
MeGo offers seamless single sign-on across all client-facing sites! Clients can create an account in any platform and use those same credentials to log into the others. We recommend adding a login message explaining to clients that they should use their eGift/OB/OMS credentials to log in if they already have an account.
In addition, clients who choose Book Appointment in MeGo are actually using your Meevo Online Booking site seamlessly within the MeGo app! The same is true for eGift; clients will purchase gift cards from within MeGo using your eGift site!
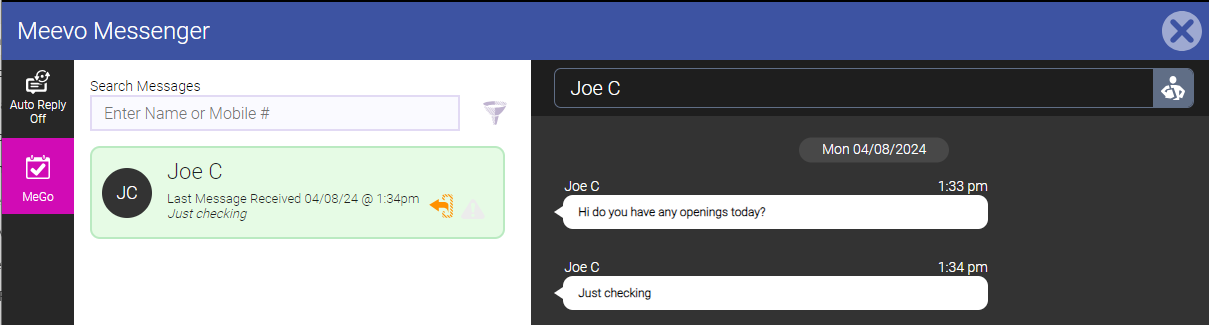
Meevo Messenger
Clients can initiate conversations with your business through their MeGo app. Your business receives those messages in a MeGo section of Meevo Messenger, where you will view and reply to those MeGo conversations.
Getting Started with MeGo
Enablement and setup notes for multi-locations:
- MeGo must be enabled in Meevo by each location that will be using the app. To enable MeGo, contact your MSI Sales Rep.
- When a location enables the integration, a MeGo tile appears under the Integration menu in the enabling location AND in Central Office.
- Each location using MeGo can control the app's availability to clients using the Enable MeGo toggle in the Branding tab. When this toggle is on, clients can log into that location through MeGo. In MeGo, a client can find your business by entering your business phone number.
- The Branding and Settings tabs are configurable only from Central Office. Locations can see Settings, but not change them.
- Locations are able to configure their own service and package menus (Service Menu Config and Package Menu Config tabs), as well as their employee bio setups (View Bio Config tab).
Once the integration has been enabled, select the MeGo tile in the Integration menu (or type mego into the Convobar) and get started customizing the app's branding and settings.
Configuring and Customizing MeGo
Note: Customizations do not apply to the Business Locator page; that page is static and cannot be adjusted.
Security
Use Security Roles Manager to set up access to the various MeGo tabs and options within Meevo:
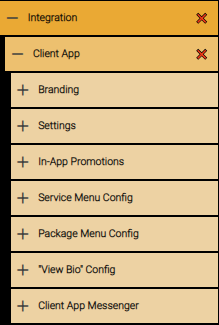
- The first six security keys (from Branding to "View Bio" Config) control View and Edit access to the six MeGo Settings tabs.
- The Client App Messenger key grants access to MeGo messages in Meevo Messenger. To see MeGo messages from clients in Meevo Messenger, the logged-in employee must have Grant access to the Client App Messenger key. If your employee is not receiving MeGo messages in Meevo Messenger, be sure to check the state of this key for their assigned Security Role.
Branding
Adjust the look and feel of MeGo in the Branding tab. This is where you can match your business's brand colors and logo, as well as post a custom message that appears to clients each time they log into the app. We recommend matching your brand colors precisely using hex codes.
These settings are updated in MeGo in real time, so you can have the app open on a mobile device to quickly see how your changes affect the look and feel of the app.
Note: In multi-location business models, only Central Office can configure MeGo Branding options.
- Enable the app for client use: This toggle controls whether your business will be available for clients to log into through MeGo. While you're first setting up MeGo, we recommend keeping this option OFF, enabling it only to see how your branding changes affect the look of the app. Once all MeGo settings have been reviewed and configured, you can toggle this switch ON and notify clients of its availability.
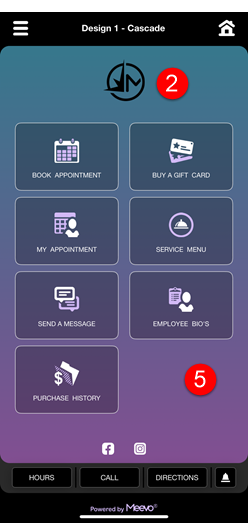
- Business Logo: The business logo you upload here appears at the top of the login screen and the Home screen (shown below). This does not change the MeGo tile icon on the client's device; that icon cannot be changed.
- Custom Message for Login Screen: Any custom message entered here appears at the top of the app's login screen. This message can convey important or helpful information to the client, such as a adjusted hours, new services, and sales or promotions. Initially, we recommend explaining to clients that they should use their eGift/OB credentials to log in if they already have an account.
- Background for Login Screen: This determines the background of the login screen. Upload an image or choose Gradient Colors from the color pickers.
- Background for Home Screen: This determines the background of the Home screen. Upload an image or choose Gradient Colors from the color pickers. Uploaded images will appear "faded" and somewhat transparent to prevent obstructing the options in the app.
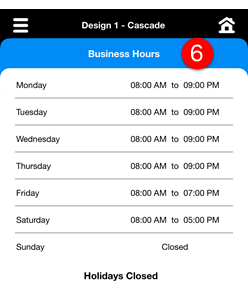
- Accent Color: The Accent Color affects the color of the header bar and text within the header bar when viewing business hours, the service menu, employee bios, or when sending a message.
- Button: The Button colors affect the colors of "action" buttons such as the Login and Business Locator buttons on the Login screen and button toggles (for example when switching between Services and Packages on the Services Menu).

Settings
The Settings tab in Meevo is where you decide which features to make available to clients within MeGo.
Note: In multi-location business models, only Central Office can configure MeGo Settings. Locations will be able to view these settings in the MeGo Settings tab, but they won't be able to make edits.

- Allow clients to book online: Turn this option on to reveal the Book Appointment tile in MeGo. This tile redirects the client to your booking site (Meevo's Online Booking or an alternate, custom site). You should enable this option only if you have Online Booking enabled or if you have a custom URL to enter into the provided field. To enter a custom URL, place the cursor in the field and begin typing.
- Allow clients to view future appointments: When enabled, the My Appointment tile appears in MeGo. Clients can select this tile to view a list of future and past appointments.
- Allow clients to cancel future appointments: Gives clients the ability to request a cancellation through the My Appointment tile in MeGo. Based on your tolerance for cancellation windows, configure how many hours before the appointment they are no longer permitted to cancel through the app. We recommend matching this value to the same option in Online Booking Settings.
- Allow clients to check-in for appointments: Gives clients the ability to check-in for an appointment through the My Appointment tile in MeGo. Configure how soon before an appointment they are permitted to check-in (15, 30, 45, or 60 minutes).
- Allow clients to view the service menu and description: When enabled, MeGo displays a Service Menu tile, which lists your available services and prices (as well as packages and their prices if the sub-option below is enabled).
- Allow clients to view available packages and descriptions: Enable this to add a Packages tab to the Service Menu; this tab lists your available packages and prices.
- Allow clients to view employee bios: When enabled, the Employee Bio's tile appears in MeGo. This tile lists available employees and their bios, along with 5 Star Review overall ratings and published reviews if the sub-options below are enabled.
- Allow clients to view overall 5 star rating: Displays the client's overall (average) 5-star rating in the Employee Bio tile.
- Allow clients to view published 5 star reviews: Adds a Reviews tab to the Employee Bio tile. The Reviews tab displays all published review for each available employee, organized by employee.
- Allow clients to view employee titles: Exposes the Employee Title field (as defined in the employee profile) in the Employee Bio's section of MeGo.
- Allow clients to buy a gift card: When enabled, the Buy a Gift Card tile appears in MeGo. This tile redirects the client to your eGift site or an alternate, custom website. You should enable this option only if you have eGift enabled or if you have a custom URL to enter into the provided field. To enter a custom URL, place the cursor in the field and begin typing.
- Allow clients to buy products: When enabled, the Buy Products tile appears in MeGo. This tile redirects the client to your e-Commerce website. You should enable this option only if you have a custom URL to enter into the provided field. To enter a custom URL, place the cursor in the field and begin typing.
- Allow clients to send/receive messages with business: When enabled, the Send a Message tile appears in MeGo, allowing clients to initiate conversations with your business. See our section on MeGo chats for more details.
- Allow clients to view services and retail purchase history: When enabled, the Purchase History tile appears in MeGo; this tile lists the logged-in client's service and retail purchase history, along with the price paid if the sub-option below is also enabled.
- Allow clients to view price paid: Exposes the price paid by the client for each line item in history.
- Show client point balance when viewing profile: Exposes the client's points balance within the hamburger menu, along with the point value if that sub-option is also enabled.
- Show point value: Displays the value of the client's points balance within the hamburger menu..
In-App Promotions
In-app promotions are a great way to make clients aware of important information like your business's sales and promotions, or a new service provider or service. Active in-app promotions appear within MeGo when the client first logs in, and you can also configure them to be sent to clients as push notifications when the promotion first becomes available.
To help you get a promotion up and running more quickly, we designed a series of customizable templates that can you can use as a starting point when creating a promotion in MeGo. You'll have plenty of room for text and images within each template, so you can add and position any element to the promotion using the provided controls.
Note: In multi-location business models, only Central Office can configure MeGo in-app Promotions. Locations cannot see this tab.
- To begin creating a new promotion, select Add New. Select an existing promotion's Display Name to view and edit its settings.
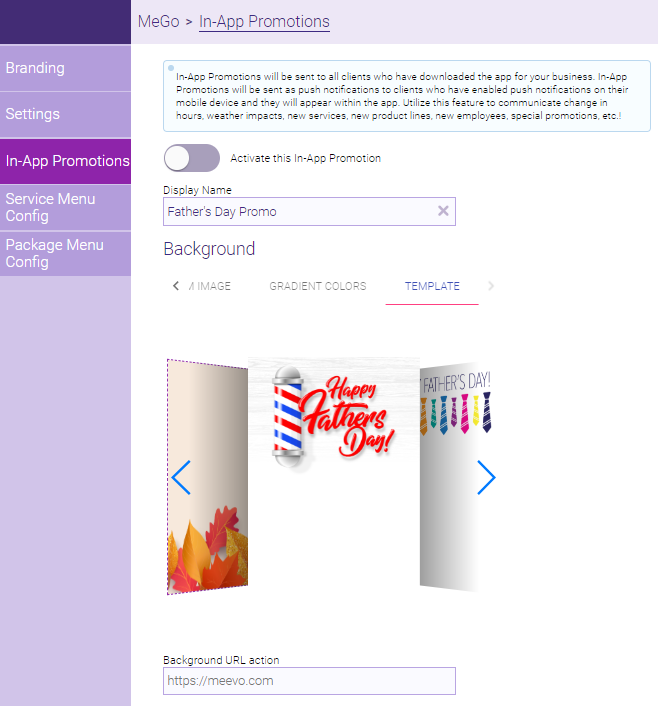
- Activate this In-App Promotion: This toggle makes the promotion "live," meaning it will be available on the configured Start showing date. Leave this option OFF until you are completely finished setting up the promotion and are ready to share it with clients.
- Display Name: This is how you'll identify the promotion in Meevo within the In-App Promotions list. Clients will not see how you name your promotion.
- Background: This can be a custom image you upload, a color gradient, or one of our predefined templates. The Preview box shows how the promotion will look to clients.
- Background URL action: This URL is where clients will be taken if they tap your in-app promotion. If left blank, the promotion will not link to a site and Click % will not be tracked for this promotion. If you add a Button promotional element, this turns off the background URL.
- Promotional element: Select a Button, Image, or Text to appear over the background image or gradient. Note adding a Button will disable any Background URL, as the button is configured with its own Button click URL.
- Schedule: Determine when the in-app promotion will appear to clients using the Start showing and Stop showing date pickers. If Stop showing is left blank, the promotion will run indefinitely unless an end date is eventually applied.
- Notify my app users when this promotion becomes available: Clients will receive a push notification (if enabled on the device) when the promotion becomes available. This push notification only occurs once, and the checkbox will reset to OFF once the push notification is sent.
- Show this promotion upon login: Determine whether the promotion appears only once to the client, or if it should appear each time the client logs in. If you choose Every time, clients will have an option in the app to select Do not show this again.
- When finished, make sure to activate the promotion!
Promotion Impression Data
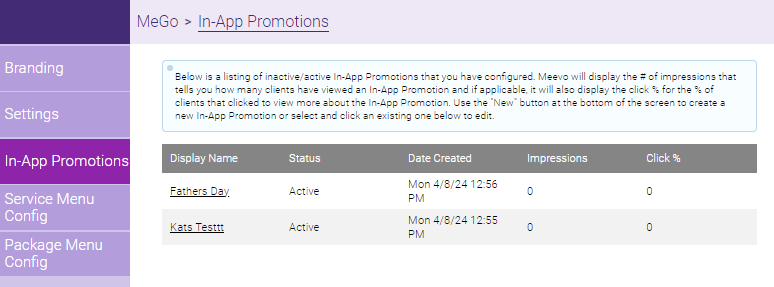
When you first select the In-App Promotions tab in Meevo, a table of existing promotions appears with "impression" data.
- Each user counts as 1 impression, regardless of how many times that user has seen the promotion.
- The Click % tracks the percentage of users who interacted with the promotion (that is, users who selected an image or button to jump to a linked site).
- Click % is only tracked if you link to another site by filling in the Background URL action field.
Service Menu Config
This tab allows you to configure which services and prices appear in the Service Menu. These services will appear in MeGo only if Allow clients to view the service menu and description is enabled.
- All Service Categories and services are enabled by default. In multi-locations, Central Office can adjust the selection of CO-owned services; locations can adjust those CO selections and their own local services, as well as pricing for all services.
- Level 1 pricing is displayed by default. To edit pricing, select Edit and make your changes.
- These edits apply to how pricing appears in the MeGo app only, so you can include characters like symbols and letters.
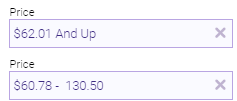
- You can even include phrases such as "and up" to indicate a base price or "call for pricing" if you'd rather not advertise the price in the app.
- Adjust the order in which Service Categories are displayed in the app within Business Settings > Business Information > Service Category Display Order.
- Long descriptions configured in the service definition are displayed within the app beneath the service name.
Package Menu Config
This tab allows you to configure which packages and prices appear in the Packages tab of the Services Menu. These packages will appear in MeGo only if Allow clients to view available packages and descriptions is enabled.
- All packages are enabled by default. In multi-locations, Central Office can adjust the selection of CO-owned packages; locations can adjust those CO selections and their own local packages, as well as pricing for all packages.
- To edit pricing, select Edit and make your changes. These edits only apply to how pricing appears in the app, so you can add characters like symbols and letters such as "and up" and price ranges.
- To edit the order in which the packages appear in MeGo, select Edit and use the up and down arrows to reorder the list.
- Descriptions configured in the package definition are displayed within the app beneath the package name.
View Bio Config
On this tab you can select which employees, Students & Teachers if enabled, and Employee Categories will be displayed within the app if Allow clients to view bios is enabled. In multi-locations, only a location can configure this tab.
Deselect any employee who you do not want to appear in the app (Front Desk staff, for example).
Messaging with MeGo
You'll view and respond to client MeGo messages through the MeGo tab in Meevo Messenger. Remember, MeGo messages do not count against your text message allotment.
- Within Meevo Messenger Settings is the MeGo settings tab, which contains options for setting up auto-replies and employee notifications in MeGo.
- Only clients can initiate a conversation through MeGo. Once a client initiates a conversation, you can reply and send messages to the client in Meevo Messenger without restrictions. See Using Meevo Messenger for details on using Messenger chat.
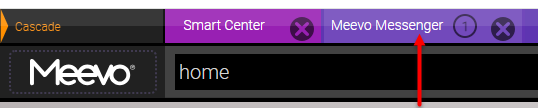
- When a client initiates a conversation, configured employees will be notified in Meevo by a pulsing Meevo Messenger tab. This tab will appear even if Meevo Messenger was not open when the message arrived.
- Your business has 14 days to respond to a message from a client. After 14 days, you can still view the message, but you will be unable to reply.
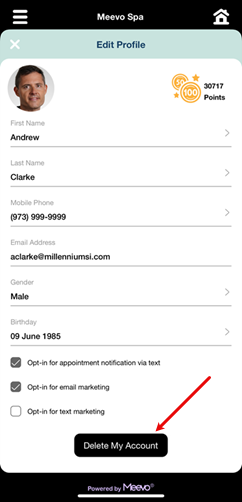
Details on Client Account Deletion
To comply with Apple and Android requirements, clients using MeGo can now permanently delete their MeGo account and Meevo profile by selecting Delete My Account from the Edit Profile screen.
- Purged profiles in Meevo are no longer available to be viewed or looked up, but historical data associated with the client will remain in Meevo to be viewed and reported on.
- We understand how important client data is to your business, so rest assured that Meevo's purge rules are still enforced. If the profile is not eligible to be purged, then nothing will happen to the client's profile. The app will display a message to the client detailing the reasons the profile can't be deleted and instructing them to call the business for further assistance.
- A client profile cannot be purged if the client has any of the following:
- An active or future membership, or a membership in cancellation
- An active or expired package set to Available for use
- Current gift cards with a remaining value greater than 0 or future gift cards
- At least one future appointment on the book
- An on-hold transaction
- An account balance greater than $0.00
- Active client points
- Restricted option selected in their profile
- Head of Household option selected in their profile (a client who is the parent/guardian of a minor cannot be deleted)
- A transaction that occurred today