Meevo Alerts: Alerts Manager and Alerts Log
What is Alerts Manager?
In Alerts Manager, you can set up alerts that send notifications when a particular action is performed in Meevo. These alerts can be highly customized, allowing you to define everything from the specific action that triggers the alert, who can trigger the alert (individual employees or any employee), who will receive the alert, and by which means the alert will be sent.
Note: Meevo alerts are not affected by Meevo Blackout Times; alerts are sent as soon as they are triggered.
What is Alerts Log?
Alerts Log is a list of all alerts that were logged as a result of your setup in Alerts Manager. You can use the filters at the top of the form to search for alerts across a specific date range (up to 12 months into the past), by a particular alert category, or by the employee who received the alerts.
Which alerts are available in Alerts Manager?
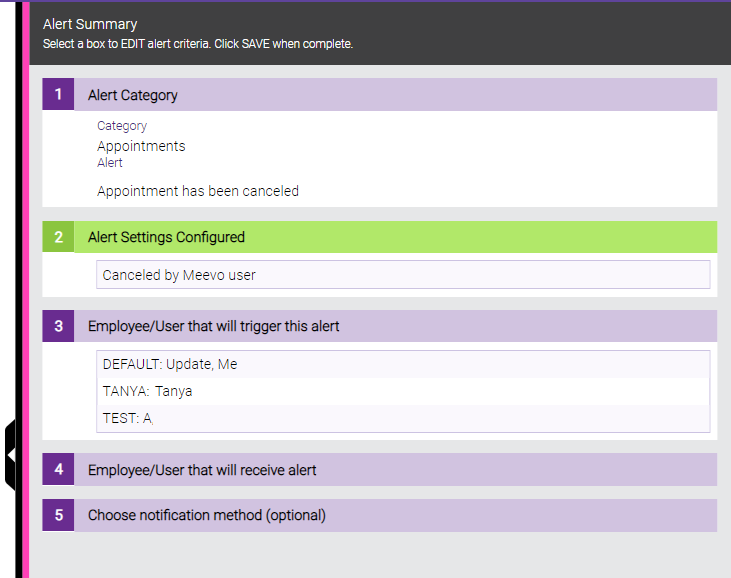
- Appointment has been canceled: Sends an alert to the selected recipients when an appointment is canceled. This alert can be configured for cancellations made by Meevo users or cancellations made by a Meevo client.
- Appointment needs to be rescheduled: Sends an alert to the selected recipients when an appointment status is changed to Request to Reschedule.
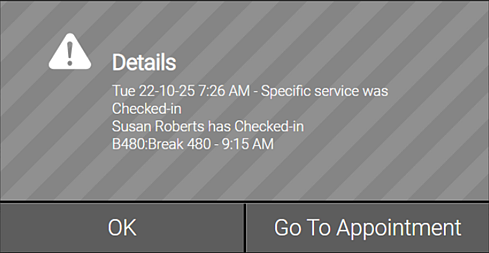
- Appointment service(s) are Checked-in: Sends an alert to the servicing employee when a client is checked-in for the services that you selected during the Configure Alert step.
- Rating is submitted: Sends an alert to the selected recipients when a client submits a rating.
- Service is booked: Sends an alert to the selected recipients when the selected services are booked.
- Employee clocks in early or late and Employee clocks out early or late: Sends an alert when the employee clocks in or clocks out earlier or later than the scheduled start or end time.
- Employee has worked more than their scheduled time: Sends an alert when an employee works more than x minutes over their scheduled time, with x being the configured duration in the Configure Alert step.
- Docs and Forms have been submitted: Sends an alert when the defined forms have been submitted.
- Gift card is sold online: Sends an alert when an eGift card is sold online with the selected delivery methods.
- Quickbooks Integration has not been synced for amount of time: Sends an alert when the Quickbooks Integration has not be synced in x days, with x being the number of days configured in the Configure Alert step. You can also configure this alert to be re-sent every x days after the first alert, with x being the number of days configured in the Configure Alert step.
- Product is low on inventory: Sends an alert when any product's on-hand value drops below its order point as a result of activity that occurs in the Register or the Employee Supply Usage screen. The alert notification includes the current on-hand count of the low-inventory item.
Note: Inventory Count adjustments do not trigger this alert, as they are considered a manual reconciliation action rather than an alert-triggering event.
- Product used or sold in excess of on hand count: Sends an alert when the use or sale of any product drops that product below its on-hand count.
- Email contact usage has reached 'x' percent of your allotment: For businesses using Email Marketing, this alert triggers when the number of active contacts reaches a selected percentage (50%-90%) of your monthly allotment.
- SMS credit usage has reached 'x' percent of your allotment: For businesses using SMS Marketing, this alert triggers when your SMS credit usage reaches a selected percentage (50%-90%) of your allotment for the billing period.
- Appointment canceled online: Sends an alert when a client cancels an appointment via Online Booking.
- Client registers online: Sends an alert when a client registers online for Online Booking or eGift.
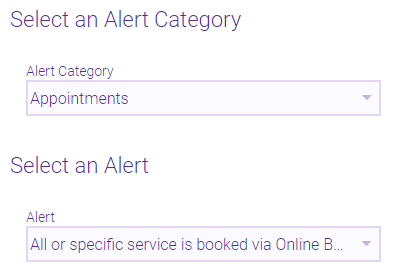
- Specific service is booked via Online Booking: Sends an alert when the selected services are booked via Online Booking. Services are selected during the Configure Alert step.
- Waitlist appointment is added/booked: This alert can be configured for one of the following events: when an Online Booking client adds themselves to the Wait List, or when an OB-created Wait List appointment is booked via a client text message response.
- Any product or service sells with a price override: Sends an alert when any product or service is sold in the register with a price override.
- Cash in any drawer falls below Opening Cash amount: Sends an alert when any drawer's Drawer Total drops below the Opening Cash amount of the most recent drawer opening.
- Change given from a gift card redemption: Sends an alert when a gift card is redeemed and cash is given as change within that same transaction.
- Closing cash is over or short more than amount: Sends an alert when any drawer's Closing Cash amount is more than or less than the amount configured in the Configure Alert step.
- Gift Card is redeemed by other than original recipient: Sends an alert when a gift card is redeemed by anyone other than the original gift card recipient.
- Gift Card is redeemed for an amount greater than the ticket total: Sends an alert when a gift card is redeemed for an amount that is greater than the transaction total.
- Gift Card is redeemed on a transaction with Gift Card purchase: Sends an alert when a gift cards is purchased and redeemed in the same transaction.
- Gift Card is redeemed that is older than X months: Sends an alert when a gift card is redeemed that is older than x months from the date of purchase, with x being the number of months configured in the Configure Alert step.
- Gift Card is sold for a price less than the value: Sends an alert when a gift card is sold for a price that is less than its Default Value.
- Membership is sold: Sends an alert when any membership is sold in the register.
- Refund transaction occurs: Sends an alert when a refund transaction occurs in the register. In the Configure Alert step, you can select which refunds will trigger the alert: Service, Product, Gift card, or Membership refunds.
- Specific gift card type is sold: Sends an alert when the selected Gift Card Types are sold in the register. In the Configure Alert step, you can choose which Gift Card Types will trigger the alert.
- Specific membership is sold: Sends an alert when the selected memberships are sold in the register. In the Configure Alert step, you can choose which memberships will trigger the alert.
- Specific package is sold: Sends an alert when the selected packages are sold in the register. In the Configure Alert step, you can choose which packages will trigger the alert.
- Specific Payment Type is used: Sends an alert when the selected Payment Types are used in the register. In the Configure Alert step, you can choose which Payment Types will trigger the alert.
- Specific product is refunded: Sends an alert when the selected products are refunded in the register. In the Configure Alert step, you can choose which products will trigger the alert.
- Specific product is sold: Sends an alert when the selected products are sold in the register. In the Configure Alert step, you can choose which products will trigger the alert.
- Specific service is refunded: Sends an alert when the selected services are refunded in the register. In the Configure Alert step, you can choose which services will trigger the alert.
- Specific service was sold: Sends an alert when the selected services are sold in the register. In the Configure Alert step, you can choose which services will trigger the alert.
- Transaction is voided: Sends an alert when any transaction is voided.
- Specific report is run: Sends an alert when the selected reports are run. In the Configure Alert step, you can choose which reports will trigger the alert.
- Access is denied to a certain feature: Sends an alert when a user is denied access to a feature. In the Configure Alert step, you can choose which feature and security keys will trigger the alert.
- Secured feature is accessed: Sends an alert when a user accesses a feature. In the Configure Alert step, you can choose which feature and security keys will trigger the alert.
- Security override occurs: Sends an alert when a user is granted access to a feature via security override. In the Configure Alert step, you can choose which feature and security keys will trigger the alert.
- SMS usage has reached "x" percent of your allotment: Sends an alert when your business's text messaging usage reaches x percent of your allotment. In the Configure Alert step, you can choose the percentage that will trigger the alert. Note that your business must be signed up for a Meevo Text Messaging Plan, as the plan determines your business's text message allotment.
Creating Alerts
- To get to the Alerts Manager, enter alerts into the Convobar, or go to Meevo > Management > Alerts Manager.
- Select Add Alert from the bottom-right corner of the screen. The Alert Summary slides out from the right.

- Alert Category: From the left pane, select an Alert Category, and then select an Alert. Note once you select Next you will be unable to make any changes to these fields.
- The Alert Summary slideout populates with the default alert settings. You can select any of these numbered headings at any time to jump directly to that alert setup step.
- When you're ready to advance, select Next from the bottom-right corner of the screen.
- Depending on the alert you selected in the previous step, there may be Alert Settings to configure in the left pane. These settings change dynamically based on the selected alert. When you are finished configuring the alert, select Next from the bottom-right corner of the screen.
- From the left pane, use the Employee mover to select who will trigger these alerts. Alerts will be sent out if any of the selected employees perform the actions that were defined in the previous two steps. To refine the list, you can use the filters that are above the movers.
Note: The following alerts do not require a "trigger" selection because the alert is generated by the system when the configured conditions are met: all Online Booking alerts, SMS usage has reached "x" percent of your allotment, Gift card is sold online, Rating is submitted, Quickbooks Integration has not been synced for amount of time, and Appointment needs to be rescheduled.
- All users who have access to this location: If selected, the alert can be triggered by any employee/user who has access to this location.
- Select Next from the bottom-right corner of the screen.
- From the left pane, use the Employee mover to select who will receive these alerts. To refine the list, you can use the filters that are above the movers.
- All users who have access to this location: If selected, all active employees and users who have access to this location will receive the alert. Note that an alert cannot be deleted if this checkbox is enabled; it must be disable before the alert can be deleted.
- Only send to selected recipients if they are the servicing employee: This option is available for certain appointment-related alerts. When this option is enabled, the employees you select using the mover will receive an alert only if they are the servicing employee on the appointment.
- Select Next from the bottom-right corner of the screen.
- From the left pane, choose how the alert notification will be sent:
- Text Notification: A text message is sent for each alert event. For an employee to receive the alert, text message notifications must be enabled for the business, the employee profile must have a valid mobile number, and Opt-in for text notifications must be enabled in the employee profile.
- Email: An email is sent for each alert event. For an employee to receive the alert, the employee profile must have a valid email address, and email notifications must be enabled for the business. The employee must have Use email for notifications enabled in the employee profile.
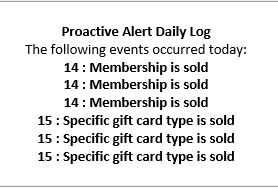
- Once per day: Sends one email to the selected employees/users; the email includes all alert events for that day. The email will be sent around 9:00 pm local time. Below is an example of a "once per day" email.
- Before saving your alert, review your settings. You can jump to any step by selecting the heading in the Alert Summary pane.
- When finished, select Save Alert. The alert now appears on the Alerts Manager home screen.
Managing Configured Alerts
To get to the Alerts Manager, enter alerts into the Convobar, or go to Meevo > Management > Alerts Manager.
To view configured alerts
Use the filters across the top of the form to display alerts. If you leave a field blank, Meevo will display all results for that particular filter.

- Alert Category: Filters alerts by the selected category.
- Employee/User: Filters alerts by the employee or user receiving the alerts.
- Employee View: Sorts alerts by the employees receiving the alerts, in alphabetical order.
- Alert View: Sorts alerts by the Alert Category, in alphabetical order.
To edit or delete configured alerts
If you have All users who have access to this location enabled, you will be unable to delete the alert unless that option is first disabled.
- Locate the alert.
- Select Edit (left) or Delete (right) beside the alert. You cannot edit the Alert or Alert Category once you've advanced beyond Step 1.


Viewing Alerts in Alerts Log
- Your user name in the top-right corner of Meevo glows when there is at least one unread alert.
- After selecting the user menu, you'll notice a glowing bell with a number, which indicates how many new alerts you have to view.
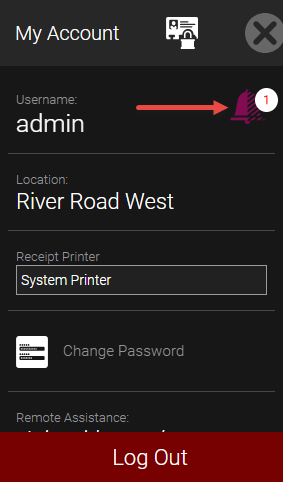
- Select the bell to open the Alerts Log. New alerts that have not yet been viewed appear in the default view.

- View an alert's details by selecting anywhere in the alert's row. Once an alert is viewed, it is removed from the default view and can be viewed again using the search filters.
Note: You must view an alert's details as described here to remove the alert from the username menu's bell icon.