Adding or Editing an Appointment Category
To get to Appointment Categories, go to Meevo > Appointments > Appointment Categories.
To add an Appointment Category
Tip: Use the copy function to quickly create a new data record with similar details to an existing item. First, locate and select the existing item, and then select Copy. Meevo 2 will create a new definition with fields that are identical to the record you just copied. Make changes to the data as needed, and select Save when finished.
- From the Appointment Categories search form, select Add New.
- Display Name: Enter a name that will make this item easy to identify in lists or menus in Meevo 2.
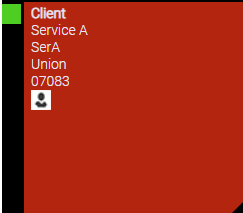
- Text and Background: Determine how the "details" section of appointments appear in the Appointment Book. Text controls the color of the appointment details text (client name, service details, add-ons, resource, and location/city/zip), while Background controls the background of the appointment.
Below, the client's appointment was assigned an Appointment Category whose Text is set to white and Background is set to red.
- When finished, select Save.
To edit an Appointment Category
Note: Some fields may not be editable if the current location is not the item's Home Location.
- Locate the Appointment Category and select it.
- Select Edit and make your changes.
- When finished, select Save.