Adding or Editing a Resource
Resources are added and maintained at the location level only. To get to Resources, type resource into the Convobar, or go to Meevo > Data > Resources.
To add a resource
Tip: To quickly add a new resource that has similar attributes to an existing one: locate and select the resource, select Copy, edit as needed, and select Save.
- From the Resources search form, select Add New.
- Select a Resource Category.
Note: The services you selected for the Resource Category will appear in the Services field of this maintenance form. You can add or remove services to this list.
- Enter a Display Name and Shortcut for this resource.
- Services: Select one or more services to associate with this Resource. If any of the services listed here are being booked in the Appointment Editor, Meevo will also attempt to book the associated resource. If the associated resource is not available, the user can select any other available resource, but a resource must be selected to book that service.
- Automatically Reorder: Makes this resource eligible for auto-reordering. Resources are automatically reordered according to what is configured in Business Information > Preferences > Resources. You can determine the resource order for each service from the Services > Resource tab.
- Maximum client capacity: The maximum number of clients that can be present in the same room at one time. Setting this value to 0 allows for manual double-booking of this resource, but Meevo will never automatically double-book the resource.
- This resource can be divided into separate resources: Select this option if the resource has a divider/partition that allows for multiple, separate clients to be booked in that resource. When this is enabled, each resource "partition" will be its own column in the Appointment Book.
- Configure the Appointment Book Style. The Appointment Book Style color scheme controls color of the client capacity column headers when you are viewing the Appointment Book in Resource View. In the example below, Room 3's Appointment Book Styles are set to black text and green background. There are 3 numbered columns in Resource View because Room 3 has a divider and a maximum client capacity of 3.
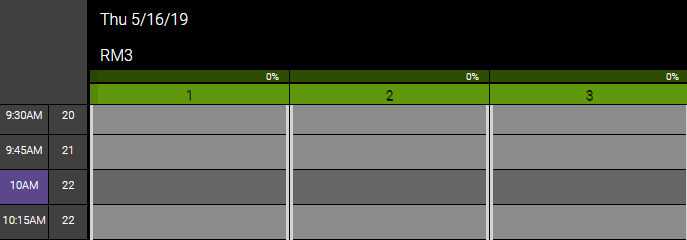
Note: Resources inherit their Resource Category's Appointment Book Style. If you change the style in the resource definition, then that resource definition determines how it will appear in the Appointment Book.
- When finished, select Save.
- To confirm that your resource is now added to the configured services, go to that service's maintenance form and view the Resources tab.
To edit a resource
- Locate the resource and select it.
- Select Edit, and make your changes.
- When finished, select Save.