Canceling Appointments
As a best practice, you should avoid canceling (deleting) appointments unless the client is guaranteed not to show. In the event a client arrives late, you can quickly edit the existing appointment service start times rather than create a brand new appointment. This also avoids sending the client numerous notifications for a new appointment while the client is already at your business.
Are there any restrictions to canceling an appointment?
You cannot cancel/delete an appointment in the past that has a transaction associated with it. You can, however, cancel/delete a past appointment if:
- There is no associated transaction with the appointment
- A no-show or cancellation fee was not processed for that appointment.
Can I cancel just one instance of a Standing Appointment?
Yes; when you delete a Standing Appointment from Smart Assistant, you have the option to delete this specific appointment or delete the series.
What if the cancellation reason I choose has a cancellation fee?
If you select a cancellation reason that has a fee:
- You have the option to process the fee now or later. All unprocessed canceled appointments appear in the Cancel/No-Show list in the register. In that list you can change the cancellation reason and/or process the cancellation fee.
- Once in the register to process a cancellation fee, the service price appears as a Cancellation Fee discount type. The cancellation fee is determined in the Cancellation Reason definition. If the Cancellation Reason allows for it, Meevo will automatically redeem a service from the client's package in lieu of the cancellation fee, but only if the service is an exact match.
- For the purpose of employee commissions, the cancellation fee essentially becomes the service price, and commission is calculated based on that fee and the employee's regular service commission rate.
- You cannot apply an employee discount, Buy X, Get Y discount type, or Must purchase x items discount type.
- You can apply predefined discounts or manual discounts in the register.
- When completed, the cancellation transaction appears as CXL in the client profile and Transaction Editor.
To cancel a single appointment
Important: The following appointments will not be included in the deletion of the Standing Appointment series and must be manually canceled: Standing Appointments in the series that were edited or moved, and any stand-alone appointments (unrelated to the standing series) that were booked for the client.
Using Quick Client Find (recommended)Using Quick Client Find (recommended)
- Locate the client using Client Quick Find.
- In the Quick Find Menu, select the Appointments tab.
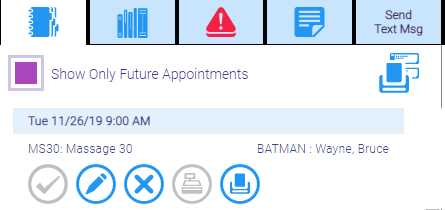
Note: Deselect Show Only Future Appointments to also view past appointments in this list.
- Select Delete.

- Verify the selected service(s), and select a cancellation reason.
- Select OK. The appointment is removed from the Appointment Book.
- If the Cancellation Reason has a cancellation fee, a pop-up window appears asking if you'd like to process the fee Now or Later.
Note: All unprocessed canceled appointments appear in the Cancel/No-Show list in the register. In that list you can change the cancellation reason and/or process the cancellation fee.
- As a best practice, verify that the appointment is deleted in the Appointment Book.
Using the Appointment BookUsing the Appointment Book
- Select the appointment in the Appointment Book to display the Smart Assistant.
- Select Delete from the Smart Assistant.
If you selected a Standing Appointment, a pop-up message displays asking if you want to delete this specific appointment or the series. Select Delete Specific Appointment.
- On the Appointment Cancellation window, select the service(s) to cancel and select a cancellation reason.
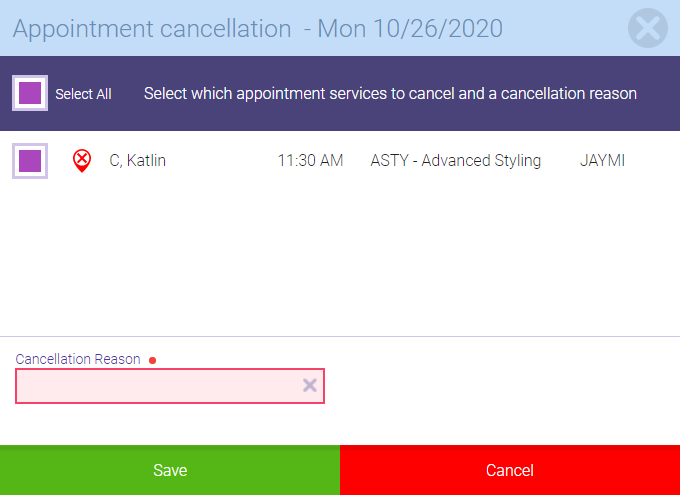
- Select Save. The appointment is removed from the Appointment Book.
- If the Cancellation Reason has a cancellation fee, a pop-up window appears asking if you'd like to process the fee Now or Later.
Note: All unprocessed canceled appointments appear in the Cancel/No-Show list in the register. In that list you can change the cancellation reason and/or process the cancellation fee.
- As a best practice, verify that the appointment is deleted in the Appointment Book.
To cancel a Standing Appointment (series of appointments)
Using Quick Client Find (recommended)Using Quick Client Find (recommended)
- Locate the appointment using Client Quick Find.
- In the Quick Find Menu, select the Appointments tab.
Note: Deselect Show Only Future Appointments to also view past appointments in this list.
- Select Delete to cancel the appointment.
- A pop-up message displays asking if you want to delete this specific appointment or the series.
IMPORTANT: If you proceed with step 5 below, all occurrences of this appointment will be removed from the calendar immediately.
- Select Delete Series.
- Select OK.
- As a best practice, verify that the appointments are deleted in the calendar before closing the Appointment Book.
Using the Appointment BookUsing the Appointment Book
- Select the appointment in the Appointment Book to display the Smart Assistant.
- Select Delete.
If you selected a Standing Appointment, a pop-up message displays asking if you want to delete this specific appointment or the series.
IMPORTANT: If you proceed with the steps below, all occurrences of this appointment will be removed from the calendar immediately.
- Select Delete Series.
- Select OK.
- As a best practice, verify that the appointments are deleted in the calendar before closing the Appointment Book.
Using the Standing Appointments maintenance formUsing the Standing Appointments maintenance form
- Go to Meevo > Appointments > Standing Appointments.
- Enter the Client name and select Search to reveal a list of Standing Appointments for that client.
- Select the appointment.
- In the appointment's form, select Delete. A confirmation message appears.
- Select Yes. All future instances of this Standing Appointment are removed from the Appointment Book.