Receiving Inventory into Product Lots
After enabling Lot Tracking, inventory must be assigned to named lots so Meevo can maintain lot-level quantities as products are received, transferred, returned, sold, or used. This topic explains how inventory enters lots through Purchase Orders and Inventory Counts.
- Receiving a Purchase Order: This method is recommended when receiving purchased inventory from a vendor.
- Inventory Count: Receive products using Inventory Count when introducing inventory without a Purchase Order, establishing beginning inventory, or reconciling inventory through a physical count.
Both workflows allow you to create new lots, receive inventory into existing lots, and record expiration dates for products configured to track expiration.
Before You Begin
Before receiving inventory into lots:
- Ensure Track Lots is enabled for the product variant.
- If expiration dates are required, verify the manufacturer's expiration date before receiving inventory.
- Determine whether inventory will be received through a Purchase Order or Inventory Count.
Receiving Inventory Through a Purchase Order
Use a Purchase Order when receiving newly purchased inventory from a vendor.
- Open or create the Purchase Order.
- When ready, select Receive on the Purchase Order and Edit to begin receiving products.
- Lot-tracked products appear with an "edit" icon beside the value in the Receiving column.
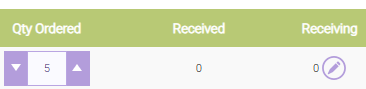
- Select the edit icon; the Receiving & Lot Allocation window appears.
- Within the window, select an existing lot from the drop-down list or begin typing to create a new one. If creating a new lot, once you've named it, select the italicized message "Create ___ as new lot".
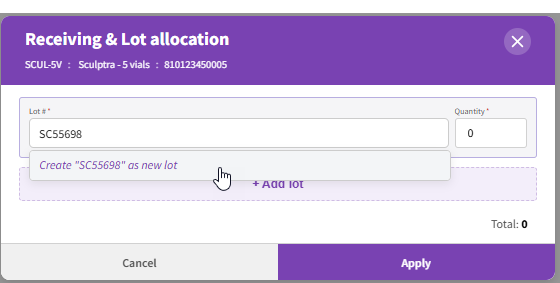
- Enter the quantity received for each lot. If required, enter an expiration date.
- To add another lot, select +Add lot and repeat these steps.
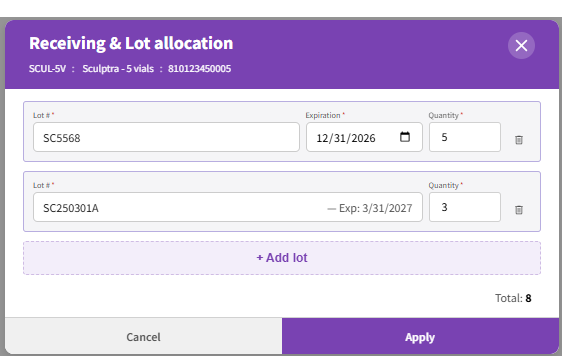
- When finished receiving, select Apply. The Receiving column updates with the quantity received, and any created lots become available throughout Meevo.
- Repeat these steps for all lot-tracked products on the Purchase Order.
Receiving Inventory Through Inventory Count
An Inventory Count can also be used to receive inventory into lots.
- Open or create an Inventory Count.
- Locate the lot-tracked product.
- Lot-tracked products appear with an "edit" icon beside the value in the Count column.
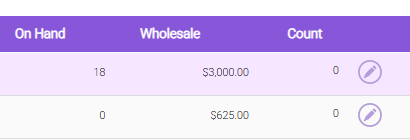
- Select the edit icon; the lot allocation window appears for the selected product.
- Within the window, select an existing lot from the drop-down list or begin typing to create a new one. If creating a new lot, once you've named it, select the italicized message "Create ___ as new lot".
- Enter the quantity received for each lot. If required, enter an expiration date.
- To add another lot, select +Add lot and repeat these steps.
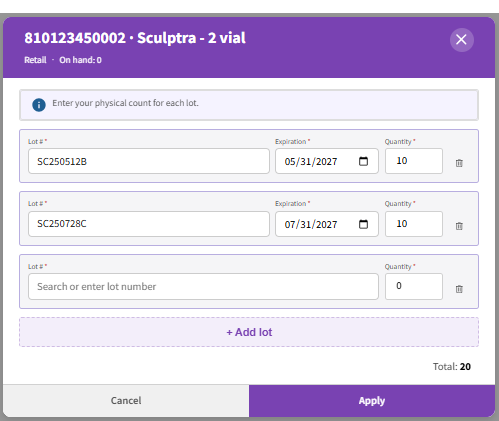
- When finished receiving, select Apply. The Count column updates to reflect the entered quantities, and any created lots become available throughout Meevo.
- Repeat these steps for all lot-tracked products in the Inventory Count.
Transferring Lot-Tracked Inventory
When transferring lot-tracked inventory between locations, lot assignments are selected at the originating location and carried through to the receiving location.
Transfer Out
- Create or open an Inventory Transfer.
- Add the lot-tracked product you want to transfer.
- For the lot-tracked product, select the lot or lots being transferred and enter the quantity for each.
- Complete the transfer as normal.
If inventory is being transferred from multiple lots, each lot is tracked separately.
Receive the Transfer
- Open the incoming transfer at the receiving location.
- Lot-tracked products display an eye icon beside the quantity transferred.
- Select the eye icon to view the lot numbers and quantities included in the transfer.
- Review the lot details, then complete the receival as normal.
Lot information is read-only during the receive step. The lot assignments made during Transfer Out are automatically carried into the receiving location.
If a transferred lot does not already exist at the receiving location, Meevo automatically creates it when the transfer is received. The lot number and expiration date, when applicable, are preserved.
Inventory Returns with Lot-Tracked Inventory
When returning lot-tracked inventory, specify which lot or lots the returned inventory should be deducted from.
- Begin an Inventory Return and add the lot-tracked product.
- Select a Lot # for the quantity being returned.
- Enter the Return Qty for that lot. If inventory from another lot is also being returned, add another lot row and repeat the process.
- Complete the return as normal.
Only existing lots with available on-hand inventory can be selected. The same lot cannot be selected more than once for the same product return.
When expiration dates are tracked, they appear alongside the lot number. Expired lots remain available for selection and are visually identified so staff can distinguish them from active lots.
Viewing Lot Inventory in Stock Levels
Once inventory has been received into lots, you can view lot-level inventory from Stock Levels. This allows you to quickly review available inventory, identify products approaching expiration, and verify quantities by lot.
For lot-tracked products, the On Hand column displays the total inventory available. Expand the product to view a breakdown of inventory by individual lot.
The lot breakdown includes:
- Lot number
- Quantity on hand
- Expiration date (when expiration tracking is enabled)
Frequently Asked Questions
Can I receive inventory into an existing lot?
Yes. If inventory arrives for a manufacturer lot that already exists for the product at your location, simply select the existing lot instead of creating a new one.
Can a single shipment contain multiple lots?
Yes. Inventory received through either workflow can be divided across multiple lots by selecting + Add lot and assigning quantities to each lot.
Can I receive inventory into more than one lot?
Yes. Inventory received through either Purchase Order Receiving or Inventory Count can be divided across multiple lots.
Do I have to record an expiration date?
Only when the product variant is configured to Track Expiration Date.
Which receiving method should I use?
Use Purchase Order Receiving when inventory is being received from a vendor through a Purchase Order. Use Inventory Count when inventory is entering the system without a Purchase Order or when inventory quantities are being established or reconciled through a physical count.