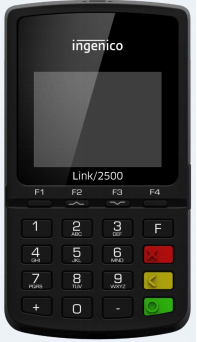
Installing the Ingenico Link/2500 (Worldpay Only)
Before you begin
- This device requires that you have a Merchant Account with Worldpay (formerly Vantiv).
- The Link/2500 supports "tap" functionality (for example, for use with Apply Pay or Google Pay).
- Read our Meevo System Requirements and Supported Devices to ensure your computer and devices are compatible with Meevo.
- Ingenico Link/2500 documentation contains important information and details from the manufacturer that are not discussed in this topic. MSI recommends you read your device documentation before proceeding with the installation.
Installation steps at a glance
|
Step 1: Add Your Merchant Account in Meevo (separate topic) |
|
Step 2: Set up the credit card terminal (this topic) |
|
Step 3: Activate or "pair" the credit card terminal with your Merchant Account in Meevo (separate topic) |
|
Step 4: Assign a default Merchant Account and credit card terminal to a drawer in Meevo (separate topic) |
Set up the credit card terminal
Important: If the Link/2500 is plugged into the charger and the charger is plugged into an outlet, do not power the device on or off. Unplug the device first, and then power it on or off. Failure to adhere to this warning can result in damage to the device. See Link/2500 documentation for further details.
- Before connecting the credit card terminal, make sure you've added your Merchant Account in Meevo.
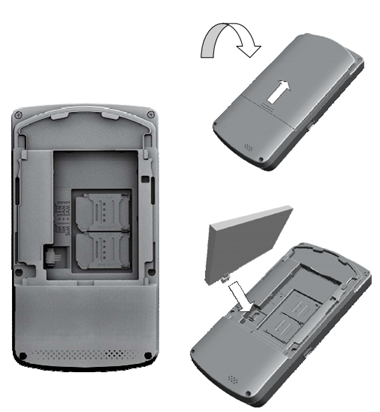
- If the battery is not already installed, insert it into the back of the device by removing the battery door and inserting the battery. Replace the battery door when finished.
- Assemble the power adapter by installing the correct plug for your country (United States plug shown below).
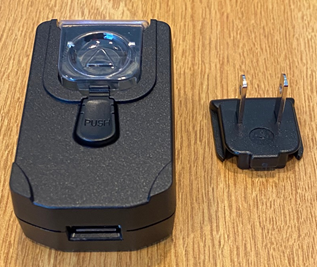
- Then, plug the USB end of the cord into the power adapter to complete the adapter assembly.

- Next, begin charging the Link/2500 by removing the flap shown below and plugging the power adapter into the side of the Link/2500. MSI recommends allowing the device to charge for 4 hours before proceeding with the rest of the steps.

Verify the date and time
Note: The following steps work only if the device has not yet been connected to Wifi. Once connected, you will need to take the device out of range of Wifi in order to perform these steps.
- With the device power on, enter 2634.
- Press F to view the menu.
- Scroll down to the Tetra menu and press the green button on the keypad.
- Scroll down to option 2 - Set Date and Time and press the green button on the keypad.
- Set your date and press the green button on the keypad when finished.
- Scroll down to set the time as well. Press the green button on the keypad when finished.
- Press the red button on the keypad to exit the menu.
- Reboot the Link/2500 by simultaneously selecting the yellow < key and the special characters.,#* key.
- The new date and time appear on the home screen after the reboot. You are now ready to connect to Wifi.
Connect to your network
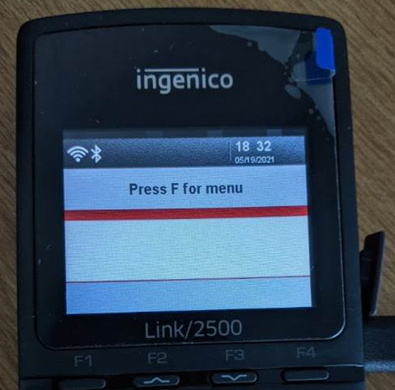
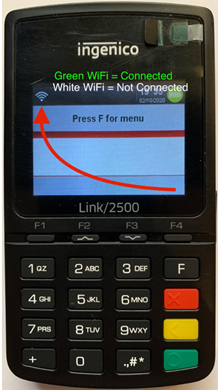
- When the device is sufficiently charged and the date and time are verified, press 2634 on the pin-pad to access the admin functions. Note the Wifi indicator in the upper-left corner. When it is white, you are not connected to a network. When it is green, you have a successful connection to a network.
- Press the F key (located above the red X key) to open the menu.
- Select the Tetra Admin menu item.

- Select 3 - Configure Wi-Fi.
- Select 2 - Scan Networks.
- When the scan completes, it displays a list of available access points. Scroll to your password-protected business Wifi and select it by pressing the Green key.
Note: You can use this device on any wireless network; it does not have to be the same network as the receipt printers or POS computer/tablet. This means that the Link/2500 can be used off-site and configured for check-out at events. Just like any other wireless device, if it is brought off-site, the device will need to connect to an active Wifi network as explained in these steps.
- Enter your Wifi password for the network you are connecting to. Use the F1, F2, F3, and F4 buttons to navigate the keyboard, or select your letters using the pin-pad. Press the # key for symbols, or the yellow key to backspace/delete.
- Press the green key to connect. Once connected, the Wifi indicator on the screen will turn green.
- Next, reboot the Link/2500 by simultaneously selecting the yellow < key and the special characters .,#* key. If the device is still plugged in, it will reboot automatically. If it is not plugged in, the device will shut down; power it back on by holding the green O key.
- The screen flashes and eventually displays an Activation Code, indicating that the device is connected to your wireless network and is ready to be activated or "paired" with your Merchant Account in Meevo.