Installing the Ingenico iSMP4 (Worldpay and CardConnect Only)

Before you begin
- This device requires that you have a Merchant Account with Worldpay (formerly Vantiv) or CardConnect.
- The iSMP4 supports "tap" functionality (for example, for use with Apply Pay or Google Pay) for both CardConnect and Worldpay.
- Read our Meevo System Requirements and Supported Devices to ensure your computer and devices are compatible with Meevo.
- Ingenico iMSP4 documentation contains important information and details from the manufacturer that are not discussed in this topic. MSI recommends you read your device documentation before proceeding with the installation.
Installation steps at glance
|
Step 1: Add Your Merchant Account in Meevo (separate topic) |
|
Step 2: Hook up the credit card terminal (this topic) |
|
Step 3: Activate or "pair" the credit card terminal with your Merchant Account in Meevo (separate topic) |
|
Step 4: Assign a default Merchant Account and credit card terminal to a drawer in Meevo (separate topic) |
Set up the credit card terminal
Important: If the iSMP4 is plugged into the charger and the charger is plugged into an outlet, do not power the device on or off. Unplug the device first, and then power it on or off. Failure to adhere to this warning can result in damage to the device. Refer to your iSMP4 User's Guide for details.
- Before connecting the credit card terminal, make sure you've added your Merchant Account in Meevo.
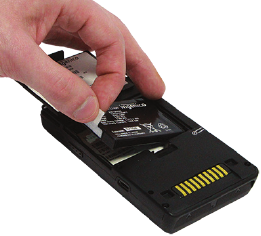
- Use the image below and the iSMP4 device documentation to familiarize yourself with the components.

The components, from left to right, are:
- Ingenico iSMP4
- USB - C cable
- Power adapter
- Battery
- If it is not already installed, insert the battery into the back of the device by lifting the battery door and inserting the battery.
- Begin charging the iSMP4 using the power adapter, USB cable, or optional charging doc. MSI recommends allowing the device to charge for 4 hours before proceeding with next steps.
- Next, connect the iSMP4 to your WiFi network. Follow the steps according to your merchant provider.
Connect a Worldpay iSMP4 to WiFi
These steps are specific to Worldpay iSMP4s. For details on connecting a CardConnect iSMP4 to WiFi, see the section below this one.
- Press the green power button on the right side of the keypad to start the boot process. A few system screens will appear, ending on a blank Lane Closed screen. When the Lane Closed screen appears, you are ready to connect the device to your wireless network.
- Press the F key 4 times quickly to enter the Communication Settings screen.
- Press the F4 key to enter the Configured Access Points screen.

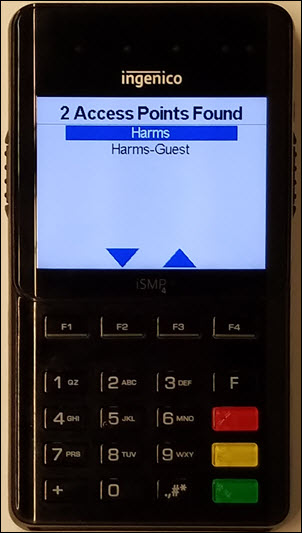
- On the Configured Access Points screen, press F1 to add a new connection. The device scans for nearby WiFi networks.
- When the scan completes, it displays a list of available access points. Scroll to your password-protected business WiFi and select it by pressing the Green key.
Note: You can use this device on any wireless network; it does not have to be the same network as the receipt printers or POS computer/tablet. This means that the iSMP4 can be used off-site and configured for check-out at events. Just like any other wireless device, if it is brought off-site, the device will need to connect to an active WiFi network as explained in these steps.
- On the Select Security screen, select WPA/WPA2.

- On the Enter Password screen, enter the WiFi password for the network you are connecting to.

- Press the green key to save. The screen flashes and eventually displays an Activation Code, indicating that the device is connected to your wireless network and is ready to be activated or "paired" with your Merchant Account in Meevo.
Connect a CardConnect iSMP4 to WiFi
The steps below were taken directly from the CardConnect iSMP4 User's Guide. Be sure to review that guide as well before connecting the iSMP4 to a WiFi network.
- Open the Bolt S.O.S. menu by pressing F, 7, 6, 7.
- Press F2 to scroll down and highlight Wifi Properties.
- Press O (the green button) to select Wifi Properties.
- Press O (the green button) to Scan for networks.
- Press F2 to scroll down the list and press O (the green button) to select a WiFi network.
- Enter the WiFi password and press O (the green button).
- The device displays Profile for <Network Name> created.
- Press O (the green button) to acknowledge the message.
- The iSMP4 displays a message that a restart is required and then automatically restarts.
- The device restarts, connects to the Wi-Fi, and displays Bolted at the bottom of the screen when ready for use.