Visit Note Types
Visit Note Types are used to categorize Visit Notes; you'll assign a Visit Note Type at the time the Visit Note is being created. Visit Note Types are a way to organize your Visit Notes in reports, and they can be useful as filters if you wish to exclude certain Visit Note Types from reports.
How can I make it easier for employees to leave Visit Notes for clients?
We recommend you associate a Visit Note Type with a service. Meevo will prompts employees to record Visit Notes by automatically displaying a Visit Notes pop-up window after the service is rung up if the Business Preferences setting Prompt to enter visit notes upon completion of a transaction for services configured with a visit note type be enabled.
What is a Private Visit Note Type?
When a Visit Note Type is marked Private, all Visit Notes of that type are viewable only from the Visit Notes tab of the client profile. Private Visit Notes will never show up on reports.
The Security Administration key Data > Client > Visit Notes > View Private Visit Note controls who can see Private Visit Notes.
Note: The Business Preferences setting Show Visit Notes across locations makes Private Visit Notes viewable across locations through the client profile, but only if the Meevo user has appropriate security to view those private notes. This option does not display Private Visit Notes on Work Tickets.
What is a Visit Note Type template?
Businesses like those in the med-spa industry are required to keep detailed notes on client/patient history. Those notes often follow a format or template so that the same information is captured for each client. When you can create a Visit Note template for a Visit Note Type definition, Meevo applies that template each time a new note with that Visit Note Type is created.
Adding a Visit Note Type
- To get to Visit Note Types, type visitnotetype into the Convobar, or go to Meevo > Data > Visit Note Types.From the Visit Note Types search form, select Add New.
- Enter a Display Name and Short Description of the Visit Note Type.
- Add Annotation / Mark Up: Enable this option to allow an image to be uploaded for this Visit Note Type. Uploaded images can be marked up/annotated during Visit Note entry/creation. The image is usually something simple like an outline of the human body or line art of a face.
- If you upload an image to the Visit Note Type, that image will be the template whenever this Visit Note Type is selected. The image cannot be changed during visit note creation.
- If you enable the option but do not upload an image to the Visit Note Type, the user entering the Visit Note can upload up to 5 images for annotation during Visit Note entry/creation.
- Annotated Visit Notes are available anywhere Visit Notes can be entered or viewed, and they can be viewed across locations if the Show Visit Notes across locations option is enabled in Business Preferences.
- Private: When a Visit Note Type is marked Private, all Visit Notes of that type will be viewable only from Clients > Visit Notes. Private Visit Notes will never show up on reports.
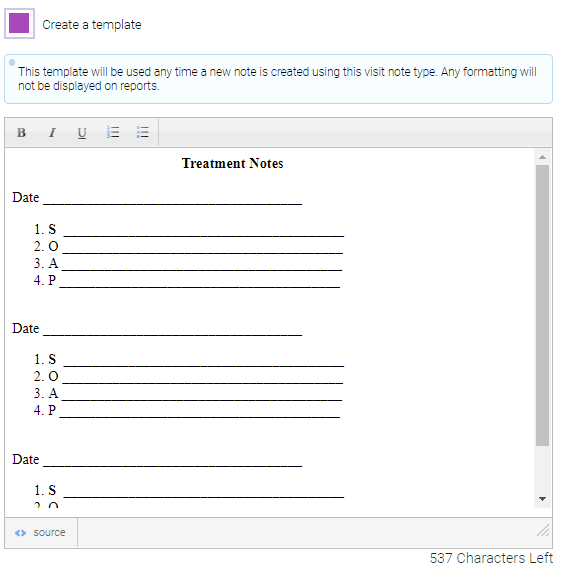
- Create a template: To add a Visit Note template, select Create a template and format the note as needed. The template will appear automatically when a new note is created using this Visit Note Type.
- Obtain who approved/reviewed the visit note: Designates this Visit Note Type as "requiring approval." See the FAQ above for details.
- When finished, select Save.
Business Types and data in Central Office
If you configured Business Types, select one from the Business Types drop-down. Only locations of the same Business Type will have access to this item once it is made available.
Reminder: Business Types are a way to categorize locations that offer vastly different services. For example, a Med Spa location would be set to a different Business Type than, say, a hair salon. In this way, Business Types ensure that unrelated data does not appear at a location (such as a Men's Haircut service appearing in a MedSpa's services list). For the vast majority of businesses, Business Types are not necessary.
Select Make available to locations to make this item immediately available to locations. In Location Options, you can exclude locations and manage how Meevo handles local overrides.
Note: If you select a Business Type and make an item available to locations, then after saving, you cannot change from one Business Type to another. However, you can at any time change from a single Business Type to All Business Types (as long as All Business Types is an available option for this item).
Editing a Visit Note Type
Note: Some fields on the form may not be editable if the current location is not the item's Home Location.
Note: Once an item is saved with a Business Type selected and the item is made available to locations, then the Business type cannot be changed to anything other than All Business Types.
- Locate the Visit Note Type and select it.
- Select Edit, and make your changes.
- When finished, select Save.
Inactivating or reactivating a Visit Note Type
When you inactivate a Visit Note Type:
- The Visit Note Type remains unchanged in client profiles that have this Visit Notes Type associated with a Visit Note.
- It is no longer selectable from any forms or menus in Meevo.
- It can still appear in Meevo reports.
- It does not appear in Meevo search results unless Inactive is selected from the Advanced menu.
- If you inactivated the item in Central Office, the item becomes inactive in associated locations as well.
- Remember that only the owner (as determined by the Owned By field) of the item can inactivate or reactivate it.
Tip: Remember to select Inactive from the Advanced Search menu to search for inactive items.
- Locate the Visit Note Type and select it.
- Select Edit.
- Toggle the status switch to Inactive or Active.

![]()
- Select Save to update the status.
Deleting or undeleting a Visit Note Type
When you delete a Visit Note Type:
- The Visit Note Type remains unchanged in client profiles that have this Visit Notes Type associated with a Visit Note.
- It is no longer selectable from any Meevo forms or menus.
- It does not appear in Meevo search results unless Deleted is selected from the Advanced menu.
- It may still appear in Meevo reports depending on the report setup criteria.
- If you deleted the item in Central Office, the item becomes deleted in associated locations as well.
- Remember that only the owner (as determined by the Owned By field) of the item can delete or undelete it.
Note:To delete or undelete this item, the current location must be its Home Location.
To delete or undelete a Visit Note Type:
- Locate the Visit Note Type and select it.
- Select Delete or Undelete.
- If deleting, a confirmation message appears. Select Yes to complete the deletion.
- If undeleting, the form becomes active after you select Undelete. Select Save to finish undeleting.