Employee Templates
To get to Employee Templates, type emptemp into the Convobar, or go to Meevo > Data > Employee Templates.
Use an Employee Template to quickly apply a common set of options to a new or existing employee profile. Applying a template makes setting up new employees and promoting existing employees a quick process, as it saves you from having to set each option in each employee profile.
Applying an Employee Template is an optional feature, but it is highly recommended that you set them up before adding employee profiles as templates streamline employee profile and promotion setup.
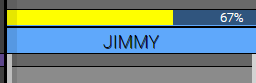
Employee Template settings can determine how an employee's column header appears in the Appointment Book. In the example below, we applied an Employee Template to Jimmy's profile with the Appointment Book Style Background set to a shade of blue.
How do I apply an Employee Template?
Note: To create and save an Employee Template, you must be able to select at least one Employee Category.
In an employee's profile or promotion screen, select an Employee Template. You can then choose which template options to apply. If you are applying an Employee Template in Central Office, note that this will change the employee profile in Central Office only; the template will also need to be applied to the employee at each individual location in which they work.
Can I edit the options in an employee's profile after applying an Employee Template?
Yes! There is no ongoing relationship between a template and a profile, so you can apply an Employee Template to a profile and then make changes to the profile without affecting the original template. If you edit an Employee Template, profiles that had this template applied to them will remain unchanged.
Adding an Employee Template
- From the Employee Template search form, select Add New.
- Enter a Display Name and optional Description.
- Text and Background: This determines the text and background colors of the employee's column header in the Appointment Book. In the example below, the Appointment Book Style Background is set to a shade of blue.
- Employee Category: Choose a category to add it to the list. You can repeat this step to add many more categories.
- For details on the available Options, see Adding an Employee Profile.
- When finished, select Save.
- For details on the remaining template options, see a topic below:
- Setting Up an Employee's Payroll
- Setting Up an Employee's Deductions
- Setting Up Commission Overrides
- Setting Up Employee Security
Business Types and data in Central Office
If you configured Business Types, select one from the Business Types drop-down. Only locations of the same Business Type will have access to this item once it is made available.
Reminder: Business Types are a way to categorize locations that offer vastly different services. For example, a Med Spa location would be set to a different Business Type than, say, a hair salon. In this way, Business Types ensure that unrelated data does not appear at a location (such as a Men's Haircut service appearing in a MedSpa's services list). For the vast majority of businesses, Business Types are not necessary.
Select Make available to locations to make this item immediately available to locations. In Location Options, you can exclude locations and manage how Meevo handles local overrides.
Note: If you select a Business Type and make an item available to locations, then after saving, you cannot change from one Business Type to another. However, you can at any time change from a single Business Type to All Business Types (as long as All Business Types is an available option for this item).
Applying an Employee Template
Employee Templates are applied from the Main tab of an employee profile.
Editing an Employee Template
There is no ongoing relationship between a template and a profile, so you can edit an Employee Template, and profiles that had this template applied to them will remain unchanged.
Note: Some fields on the form may not be editable if the current location is not the item's Home Location.
Note: Once an item is saved with a Business Type selected and the item is made available to locations, then the Business type cannot be changed to anything other than All Business Types.
- Locate the Employee Template and select it.
- Select Edit, and make your changes.
- When finished, select Save.
Inactivating or reactivating an Employee Template
When you inactivate an Employee Template:
- Employee profiles that use this Employee Template remain unchanged.
- It is no longer selectable from any forms or menus in Meevo.
- It can still appear in Meevo reports.
- It does not appear in Meevo search results unless Inactive is selected from the Advanced menu.
- If you inactivated the item in Central Office, the item becomes inactive in associated locations as well.
- Remember that only the owner (as determined by the Owned By field) of the item can inactivate or reactivate it.
To inactivate an Employee Template:
- Locate the Employee Template and select it.
- Select Edit.
- Select the switch to toggle it to Active or Inactive.


- Select Save.
Deleting or undeleting an Employee Template
When you delete an Employee Template:
- Employee profiles that use this Employee Template remain unchanged.
- It is no longer selectable from any Meevo forms or menus.
- It does not appear in Meevo search results unless Deleted is selected from the Advanced menu.
- It may still appear in Meevo reports depending on the report setup criteria.
- If you deleted the item in Central Office, the item becomes deleted in associated locations as well.
- Remember that only the owner (as determined by the Owned By field) of the item can delete or undelete it.
To delete an Employee Template:
- Locate the Employee Template and select it.
- Select Delete or Undelete.
- If deleting, a confirmation message appears. Select Yes to complete the deletion.
- If undeleting, the form becomes active after you select Undelete. Select Save to finish undeleting.